This blog is all about Food. Real Food. Food that Nourishes, Heart and Soul.

Real Ingredients, Organic and Locally sourced whenever and where ever possible, shared with love.

No packages, no ingredients that are impossible to pronounce.

Real, honest food, from my kitchen to yours. Enjoy!

Sunday 27 October 2013

Grain Free Coconut Flour Carrot Cake, and a New Product Review!

This post is a recipe re-make of sorts, and my very first product review, all at the same time! A few weeks back, at the Fall CHFA show (Health Food Trade Show) one of my favourite Demo-reps-turned-sales-rep Deb introduced me to the VP of St. Francis Herb Farm. This company, from Eastern Ontario, has an amazing product line up, I have been a fan for years. Deb mentioned my blog to him and he ended up giving me a bottle of their new Coconut Oil & Butter Ghee Cooking Sprays to try out. I had already been ogling it, being a fan of their Butter Ghee and Coconut Oil Butter Ghee already, this spray caught my eye right away. Having given up the aerosol oil sprays years ago, I have been using the old school method of greasing pans, using a gob of butter and a paper towel, or my silicone basting brush with decent results, albeit messy! But, I have missed the tidy convenience of the spray, and I was thrilled to test drive this virtuous and healthy spray. Butter Ghee and Coconut Oil have amazing health benefits, and this product combines them in a super convenient spray with no unhealthy aerosols or propellants, a definite bonus!
I have been promising to make my hubbie a carrot cake, and it was the perfect test run for the Coconut Oil and Butter Ghee Spray. I am pleased to say it did not disappoint! The carrot cakes popped right out of the pan after a quick run around with a knife, with alot less fuss and muss than the paper towel/butter method. (I did line my pans with a piece of parchment on the bottom, a bit of extra insurance that I would have used with plain old butter as well!) I am impressed and look forward to trying many more things with this spray!

For the hubbie-promised carrot cake, I used my tried and true Grain Free Coconut Flour Carrot Cake Muffin recipe, and simply doubled it. I baked it in two greased and lined 8 inch round pans, for 50 minutes at 375F. (note the increased temp and time from the muffin recipe!) For the icing, I used 2 tubs of Western plain creme cheese, and added 2 tbsp of Cocovie Vanilla Coconut Jam, and 2 Tbsp of coconut sugar, blended well in my stand mixer. The cake was amazing, to say the least, a definite keeper!


The first slice, just waiting for a fork!

Ready to bake!


Monday 21 October 2013

Chunky Butternut Squash Soup With Bacon And Kale

With fall settling in to Southern Ontario, the days are rapidly changing from salad days to soup days. Hearty stick to your ribs kind of soups that comfort , nourish and warm you to the core. This is a perfect recipe for a fall lunch or dinner, I hope you enjoy it!
The squash could be roasted in advance to save a bit of time, making this an easy soup to get on the dinner table fast. 

Chunky Butternut Squash Soup With Bacon And Kale

1 large butternut squash
1 tbsp coconut oil
1 cup finely diced bacon
2 onions, peeled and chopped (a very generous cup full!)
1 bunch kale, tough stems removed, and chopped
1 tsp dried oregano
½ tsp paprika
½ tsp turmeric
1 clove garlic
1 tsp salt
7 cups bone broth (I used chicken)

Preheat oven to 375F
Cut squash into manageable chunks, peel and remove the seeds. Cut into 1 ½ inch chunks, toss with coconut oil, and roast in a large pan in preheated oven for 60 minutes. The squash should be softened and just starting to brown slightly. Remove from oven and set aside. 
Sauté the bacon in a heavy bottomed large pot, stirring often until just cooked thru, approx 4-5 minutes. Add the diced onions and cook until the onions start to soften, another 4-5 minutes. Add the Kale and the spices, and sauté for another 2-3 minutes.

Add the pre-roasted squash to the pot and lightly mash to break up the chunks slightly. This helps add some body to the soup.

Add 1 cup of the bone broth to the pot, and stir, scraping  to deglaze the bottom of the pan. Add the remaining broth and bring to a boil. Simmer for 5 minutes, and serve

Tuesday 8 October 2013

Grain Free Dairy Free Pumpkin Bars

I think fall is my favourite season of the year. Don’t get me wrong, spring is amazing with all the new growth, and gardening and such. Summer has its moments too, with the hot lazy sunny days, and warm nights spent sitting on the patio. Winter has….lets see, um, snow… and ice… and cold… nope, not really a winter fan! But fall, now fall has it all, with the slight chill in the air, the beautiful fall colours in full splendor, and all the amazing fall produce, apples and  squashes and pumpkins, oh my!! We have these gorgeous little organic pie pumpkins at work right now, and this recipe highlights their flavour beautifully.  I am not generally a raisin fan, but the soaking method I use infuses them with a nice vanilla flavour and plumps them up nicely—no chewy raisins here! (if you would rather chewy raisins, you can skip this step all-together if you wish)

Grain Free Dairy Free Pumpkin Bars
½ cup raisins (I used Thomson Seedless, but feel free to pick what you like!)
½ cup boiling water (enough to cover raisins)
2 tsp vanilla
-----------
4 eggs
1 cup pureed roasted pumpkin (see below for cooking methods or use organic canned pumpkin, NOT pie filling!)
2 tbsp coconut oil
2 tbsp apple cider vinegar
1 tsp vanilla
½ cup coconut flour
3 tbsp chickpea flour
2 Tbsp arrowroot flour
2 tbsp ground Chia seeds
1/3 cup coconut sugar
1 ½ tsp cinnamon
1/3 tsp freshly ground nutmeg (or ½ tsp dried)
1 tsp baking soda 
pinch of salt
----------
½ cup chopped pecans

Preheat oven to 375F.
Place raisins and vanilla in a heat proof bowl or glass measuring cup. Cover with boiling water and let stand for at least 10 minutes. Set aside.
Measure the rest of the ingredients EXCEPT the pecans into a large mixing bowl. Using an immersion blender, mix all the ingredients together well, scraping the sides of the bowl if necessary.
Drain the vanilla water from the raisins (save for another use if you have one!)
Add the drained raisins and the pecans to the batter and mix with a wooden spoon to distribute evenly.
Scrape into a greased or parchment lined 9x13 glass baking pan.
Bake in preheated oven for 40-45 minutes or until a toothpick inserted in the center comes out clean.
Cool before cutting into desired sized bars or squares.


Pumpkin cooking methods:

Crockpot method: My favourite method for a pumpkin of this size could not be easier! Wash off the outside of the pumpkin, and place it  WHOLE into your Crockpot.  DO NOT cut in half, scoop out the seeds, or anything. Just plunk it in. 
Turn the Crockpot on low, and cover with lid. Cook for 6-8 hrs on low or until the pumpkin is soft through.   Remove from crockpot and let cool before cutting in half. Scoop out seeds and set aside if you wish to roast them. Scoop the pumpkin away from the skin, and puree with an immersion blender until smooth. Use as desired.
This method works well with smaller squashes too. I often do this before I go out the door to work in the morning, and come home to a perfectly roasted squash!

Oven Roasting Method: Cut pumpkin in half, scoop out seeds and roast, cut side down on a baking sheet for 60-90 minutes, or until soft thru (this will depend on the thickness of your pumpkin).  Cool, scoop and puree as above.

Thursday 3 October 2013

Oven Roasted Tomato, Onion and Garlic Sauce

This post  is pretty typical of how I create a lot of my recipes. If I have a plethora of something to use up, I usually throw something together to use up whatever that plethora may be. This time of year there is always an excess in the garden just begging to be used. Tomatoes were the needy ingredient of the day, and with the fruit fly invasion that has been plaguing my kitchen, time was of the essence! The ingredients won’t have exact measurements, but I will try and give a general idea of how much to use. The tomatoes were not any specific kind, I used some of every type in our garden, from the “tiny tim” cherries to the larger red ones that have no name, (I think there was even one green zebra!) So, not your typical sauce tomatoes, but any should work just fine!
This sauce is pretty fuss free, no peeling/blanching/straining required, just some time to roast in the oven, a perfect way to warm up the kitchen on a cool fall morning. The roasted onions add a nice body to the sauce, no need to boil it down for thickness. This is an awesome technique for peeling garlic that you have to try. I will warn you it is loud, but when you are peeling multiple cloves, it is a real time saver! All in all, an easy sauce with great roasted flavour.
Served over zucchini noodles, with
meatballs and a grain free biscuit.

Oven Roasted Tomato, Onion and Garlic Sauce

Tomatoes, (when chopped up, mine made a nice single layer on two cookie sheets)
Garlic (approx 8-9 cloves)
Onions (12 smallish onions, or 3-4 regular sized yellow cooking onions)
Coconut oil, melted (enough to give a drizzle to both pans)
Salt to taste
1 tsp Coconut sugar (optional, but rounds out the flavour)


Preheat oven to 425F, and line 2 large cookie sheets with parchment paper. 
these are what I consider a "smallish" onion
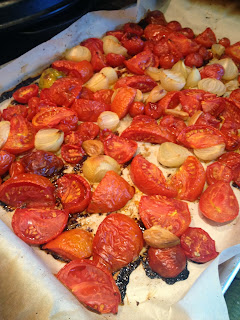
Chop your tomatoes (the tiny cherry tomatoes I left whole) into smaller chunks (see picture below for clarification).
Peel and chop your onions into similar sized chunks, add to the pans.
Peel your garlic (awesome way to peel a whole head of garlic here! It really works!!), cut cloves in half and add to the pans.
Drizzle each pan with some melted coconut oil, if I had to guess I would say there was about 1 ½ tbsp used on each pan.
Sprinkle with a bit of sea salt, and roast for about 1 ½ hrs in preheated oven. Check every so often, you want to remove them when the veggies are starting to brown and release their juices.
Remove from oven and allow to cool slightly before proceeding.
Lifting the parchment carefully, transfer the contents of both pans into a large mixing bowl. Using an immersion blender puree the sauce until it is nice and smooth.  (if you don’t like the seeds, you can strain it at this point, I generally don’t) Add the coconut sugar if desired, and re-season with salt to taste.
Serve immediately or store in mason jars in the fridge for 3-4 days, or in the freezer for 6-8 months, (just remember to leave room for expansion if freezing)

Mine made approx 7 cups of sauce.