This blog is all about Food. Real Food. Food that Nourishes, Heart and Soul.

Real Ingredients, Organic and Locally sourced whenever and where ever possible, shared with love.

No packages, no ingredients that are impossible to pronounce.

Real, honest food, from my kitchen to yours. Enjoy!

Thursday, 24 December 2015

Gluten Free Shortbread Cookies

These cookies were created for two reasons. First: they are the 12th post for my holiday “12 Days of Cookies” on my Facebook recipe page (I saved the best ‘til last!)  Second: they are one of my husband’s favourite kinds of cookies, and I thought it would be a nice Christmas gift for him! 

I sweetened them with pure dark Maple syrup, and the flavour, while not quite traditional, is divine!

As for making them grain free, as is more the norm for my baking, that was a struggle. I couldn’t seem to strike the right combo of ingredients. But, when I added in the rice flour (which is still a traditional shortbread ingredient) the whole cookie came together beautifully. Chill the dough thoroughly to make rolling out a breeze!

They do make a very tender cookie, so take care when handling the finished product, as I had a few that broke when I was plating them for a gathering.Let them cool completely before attempting to move them at all...unless you are taste testing of course!!

Gluten Free Shortbread Cookies

1 cup Butter, room temp
½ cup Maple syrup
1 ½ cups Arrowroot flour (plus a bit more for rolling out the dough
1 c white rice flour
Pinch salt

Preheat oven to 350F

Cream the butter in the bowl of a stand mixer until nice and creamy. 
Add the maple syrup and mix until well blended.
Turn mixer off, add flours and salt, turn mixer on low (to avoid a large cloud of dust!!) and mix until it all comes together into a nice dough. 
Do not over-mix!
Shape dough quickly into a disk and refrigerate for 
at least 30 minutes or until firm.
On a lightly  arrowroot or rice floured board or piece of waxed paper, roll out dough into a ¼ inch flat disc. Cut into desired shapes, re-rolling scraps(and chilling if needed) until all is used up.  
Carefully place on parchment lined cookie sheet, prick with fork 
if desired for a more traditional look.
Bake in preheated oven for 12-13 minutes or until they just slightly start to turn brown at the edges.
(You don’t want much colour at all!!)
Carefully remove from pan and let cool on a wire rack. Store in an airtight container on the counter for a few days, or in the freezer for longer storage.

Wednesday, 23 December 2015

Grain Free Maple Pecan Cookies

These little beauties are made start to finish in a food processor. If you don’t have access to one, you could use your blender to process your pecans, just pulse until they are fairly uniformly ground. (If you go too far they will become pecan butter!)They keep well at room temperature for a few days, and freeze wonderfully too. 

Grain Free Maple Pecan Cookies

1 cup pecans
¼ cup butter, slightly softened
½ cup arrowroot flour
3 Tbsp coconut flour
2 Tbsp maple syrup
2-3 Tbsp coconut sugar (use 3 for a slightly sweeter version)
½ tsp salt
½ tsp baking soda
1 tsp cinnamon

In the bowl of a food processor measure your pecans and pulse until they are fairly fine crumbs. You still want them dry, if you process too much you will make pecan butter!
Measure in the rest of the ingredients and pulse until it all comes together into a sticky dough.
Scrape out of food processor onto a plate or bowl, and chill for 30 min plus to firm up the dough.

Preheat oven to 350F

Roll chilled dough into balls and palace on parchment covered cookie sheet. Press a pecan into the top of the ball and bake in preheated oven for 10 -12 minutes. Cool on wire rack. Keep leftovers in airtight container for a few days, or freeze for later use. 


Tuesday, 22 December 2015

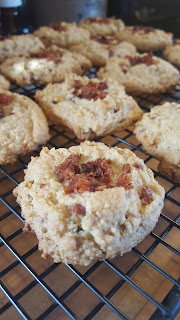
Grain Free Maple Bacon Cookies with Thyme

These grain free lovelies are a palate pleasing combination of sweet and savory. The bacon marries the maple syrup and thyme into a wonderfully different cookie, in a very good way. Use dried thyme if you must, but try to find fresh if you can!  If you don’t have bacon fat, you can sub in a good quality lard, coconut oil or butter, but the bacon fat contributes to the uniqueness of the cookie!

Grain Free Maple Bacon Cookies with Thyme

1 cup almond flour
½ cup arrowroot flour
1 Tbsp coconut flour
½ tsp baking soda
1 tsp apple cider vinegar
Pinch of salt
¼ cup dark (grade b or c) maple syrup
¼ cup cooled bacon fat
1 tsp fresh thyme leaves, woody stem and big peices removed, (sub ½ tsp dried thyme)
¼ cup + 2 Tbsp diced precooked bacon, separated.

Preheat oven to 350F

Whisk dry ingredients in medium mixing bowl. Add bacon fat and maple syrup,
 and mix with wooden spoon until well combined.
Fresh thyme has a bigger flavour profile than dried, try and find it if you can!
Luckily I still have some in the garden :)

 Add the fresh thyme and the  ¼ cup diced bacon and mix in well. Dough should be slightly sticky.
Using 2 spoons place approx 1 tbsp cookie dough on pan,
Top with a smidgen of the leftover bacon, pressing down slightly into the top of the dough to secure. 

Bake in preheated oven for 12-13 minutes or until the edges start to brown.
Remove to a wire rack to cool. 
Store any leftovers in the fridge for a few days or freezer for a few months,
if you can keep them that long!

Makes approx 16-18 cookies.
I keep bacon drippings in an empty jam or mason jar
in the fridge until I have enough to use


Friday, 11 December 2015

Grain Free Baguette

This recipe has been a work in progress since the end of September. We were taking a much needed break in the Fingerlakes with our wonderful friends. We planned a 4 day escape and rented a lakeside cottage over one of the most beautiful fall weekends you could ask for.  We hiked Watkins Glen, and had some absolutely delicious meals! (in a cottage with hodge podge of kitchen implements, it was a bit of a challenge to cook!) But, we succeeded in creating some memorable meals, and enjoyed some very much needed time away.

Our view from the deck
Watkins Glen has to be one of the
most beautiful places I have been!
renamed this one "flatbread"
Anyhoo, the whole grain free baguette quest started with a trip to Wegmans (Have you been to Wegmans?? What an amazing grocery experience!! We need Wegmans in Canada!!)We picked up a frozen Against The Grain baguette to go with dinner one night. It was pretty darn tasty, and you would honestly never know it was grain free. Which, of course, made me want to make it myself. Easy peasy…or so I thought….(those of you who follow my Facebook page may remember some of these...)

Dense! But the right shape!!
This one went straight in the trash :(
Well, multiple tries and multiple fails later, I FINALLY came up with a winner! Taste, texture and look, it has it all. It has a great shelf life for grain free as well.  It keeps well for 4 days on the counter in an airtight container, and freezes like a dream. I have toasted it as crostini, used it as a bruschetta base, and have enjoyed multiple slices with a simple skim of butter. It does not disappoint!

In all my trials I have used multiple different types of cheese, and I find ones with less moisture content work best, like a grana padano (my fav) or parmesan. That being said, I have used cheddar, asiago and mozzarella as well with good results.

My favorite cooking method is on my pizza stone in the oven, and while it gives the crust a bit more crunch, it is not absolutely necessary if you do not have one. I have used a sheet pan as well, and it works just fine.
The dark interior colour comes from the chia. I have a very large bag of black chia seeds right now, and all my experimenting has been with them. Using white chia would lighten up the inside of the bread although it won’t alter the taste at all. Give the seeds a quick whiz in a blender before using!

Grain Free Baguettes

1 c whole milk
½ cup avocado oil
-----------
finely grated Grana Padano
3 c tapioca starch
½ c ground chia seeds(whiz in a blender jar!)
1-1/2 tsp baking soda
1 tsp salt
-----------
2 eggs
2 tsp apple cider vinegar
--------------
100g  cheese, grated with small side of grater (just shy of 1 1/2 cups, NOT packed!)

Heat milk and avocado oil on medium low heat until bubbles start to form all around the edges of the pan, approx 6 min. You want it very warm but not really boiling. 

While milk is heating, in your stand mixer with paddle attachment, mix the tapioca starch, chia, baking soda and salt on low until combined.
Add the hot milk and turn up a notch on your mixer. Let mix until the mixture becomes a fairly smooth dough. Continue mixing until the dough becomes cooler to the touch.
When the dough is cooler, add the vinegar, and the eggs, one at a time, letting them combine somewhat in between. 
Mix until the eggs are well mixed in and your dough smoothes out again. It will take a bit to mix in, but trust me, it will!!
Add the grated cheese and mix well. Turn mixer off, scrape down sides of bowl with firm spatula and mix again for 1 minute to ensure all ingredients are well combined. 
Preheat oven to 425 with rack in the middle position. If you have a pizza stone, put in oven on the middle rack before preheating.

Divide dough in half evenly and with WET hands shape into two long thin baguettes on a piece of parchment paper.  Rewet hands as needed, the dough is sticky and wet hands help greatly with the shaping of your loaves!
With a wet serrated knife, slash shallow cuts diagonally across the tops of your loaves, re-wetting knife blade if it starts to stick.
Using a pizza peel (or the back of a cookie sheet) slide your loaves (still on parchment) onto hot stone in preheated oven. (alternatively, if you have no pizza stone, place the loaves (still on parchment)  on a large sheet pan and place in preheated oven)
Bake for 25 minutes or until baguettes are nicely risen and browning. Do not under bake as it changes the inner texture of your loaf.


Remove from oven and let cool on wire racks before slicing. Store in airtight container for up to 4 days at room temp. Freezes really well. 

Sunday, 22 November 2015

Grain Free Dried Cherry Walnut Espresso Bars

These bars (and numerous variations thereof) have been floating around my house for what seems like eons and I am so excited to finally share them with you! I baked numerous batches on the BBQ this summer (my oven heats up my house like crazy, even if the air is on, so I avoid it like the plague during the hottest times) and I knew the flavour was bang on. But the BBQ tends to bake on the hot side, even turned to low, and they were coming out dry. Worth the effort… but drier than I wanted them to be. Now that the cooler weather is here, and my oven is back to being a productive member of my household, I was able to bake these bars at a more appropriate temperature, and I can finally share the yumminess with you all!

Luckily the multiple test batches allowed me to play with the dried fruit/nut combo, and this is the one that we all like the best (although the cranberry/ pecan were a close runner up!) The espresso accents the chocolate, and compliments the bitter and sweet of the dried cherries and walnuts. I have used both our espresso machine and a French press to brew the espresso.   Strong coffee would be an OK substitute, but if you choose to leave it out altogether, be sure to add in another ½ cup liquid to the batter.

Grain Free Dried Cherry Walnut Espresso Bars

6 tbsp ground espresso beans
1 cup boiling water
----------
1 cup almond flour
1/3 cup coconut flour
¼ cup arrowroot flour
½ cup cocoa powder
2 tsp baking soda
1 tsp salt
1 tsp vanilla powder (or extract)
2/3 cup coconut sugar
2 Tbsp apple cider vinegar
½ cup softened coconut oil
½ cup kefir (sub yogurt or sour cream if desired)

Add ins:
1 cup chopped walnuts (or pecans)
1 cup dried cherries (or cranberries)

Preheat oven to 375F

Line a 9X13 glass baking pan with parchment paper and set aside.

In a French press, place ground espresso beans and boiling water. Set aside.
Measure all other ingredients (EXCEPT for the espresso and the add ins) into a large mixing bowl. Mix well with an immersion blender, scraping down the sides as needed.

At this point, pour your espresso from your French press into a half cup measure. Discard the rest. (or enjoy it yourself if you are so inclined!)
Mix into the batter with the immersion blender until well combined.
Stir in your add ins and mix well with a spatula. 
Scrape evenly into the parchment lined pan, smooth the top and bake in preheated oven for 27-30 minutes, or until a toothpick comes out moist but clean. Try not to over bake.
Using the edges of the parchment, lift the cooked bars from the glass pan and set them  on a wire rack. Cool, cut and store as desired. (We wrap them and store in the freezer for quick grab and go snacks)


Chop walnuts carefully with  knife if they are large pieces


Sunday, 1 November 2015

Grain Free Pumpkin Spice Muffins

When I whipped up my Grain Free Pumpkin Cream Cheese Streusel Muffins a few weekends ago, I was left with one cup of pumpkin puree...such a dilemma! I had already accomplished a lot of baking, and was tempted to just put it in the freezer for another day. But, being in the baking mode I decided to forge ahead and make one more batch of muffins. I used the same batter ingredients from that pumpkin muffin because it had spectacular flavour(why reinvent the wheel, right??) and simply added some soaked raisins and pumpkin seeds to it. This created an entirely different muffin! (which is also dairy and nut free to boot) I was going to list it as a variation with the Cream Cheese Streusel Muffins but the end results were so completely unlike each other, I felt they each needed a post of their own to let their little spirits shine :)

These ones have a more earthy and hearty feel to them, and scream fall harvest with every morsel. They are not quite as photogenic as the cream cheese ones,  but what they lack in beauty, they make up for in taste.

A note on the soaked raisins...feel free to skip this step if you like. I am not a fan of chewy raisins, and this re-hydrates and infuses them with a lovely vanilla flavour that is more to my liking. Totally skipable, but for me a necessary step!

Go ahead, try both recipes...neither will disappoint! Submerse yourself in the flavours of autumn, and enjoy each and every bite!

Grain Free Pumpkin Spice Muffins

Muffin Batter:
½ cup coconut flour
1/3 cup arrowroot flour/starch
2 tbsp chickpea flour
½ cup coconut sugar
½ tsp baking soda
½ tsp salt
1 tsp cinnamon
¼ tsp cloves
1/8 tsp allspice
½ tsp freshly ground nutmeg
¾ tsp freshly grated ginger (use a kitchen rasp) or ½ tsp dried ginger
3 eggs
2 Tbsp coconut oil
1 cup pumpkin puree (not pumkin pie filling!)
1 Tbsp apple cider vinegar

Add-Ins: 
1/2 cup raw pumpkin seeds
1/2 cup raisins (optional soaking method: place in heat proof glass bowl, cover with boiling water and a splash of vanilla. let stand for 10 minutes, drain and use as you would other raisins.

Preheat oven to 375F.  Line 12 cup muffin tins with papers or grease well and set aside.

Measure all muffin ingredients EXCEPT for the add ins, into a large mixing bowl and blend well with an immersion blender. Measure in the raisins (drained well if you are soaking)and the pumpkin seeds. Mix well with a wooden spoon or spatula.

Divide batter evenly between the 12 sections of the muffin tray. 

Bake in preheated oven for 20-23 minutes or until a toothpick comes out clean. 

Remove from tray and let cool on a wire rack. Store leftovers in fridge or freezer.