This blog is all about Food. Real Food. Food that Nourishes, Heart and Soul.

Real Ingredients, Organic and Locally sourced whenever and where ever possible, shared with love.

No packages, no ingredients that are impossible to pronounce.

Real, honest food, from my kitchen to yours. Enjoy!

Sunday, 22 June 2014

Creamy Probiotic Rich Salad Dressing

This batch is made with garlic chives
and parsley
Gardening season is in full swing and our lettuce is growing like crazy…giving salads a starring role on our daily menus!  I love it when we can pick lettuce straight from the garden and have it in a salad within minutes. Although we never seem to get bored with salads, I do like to change up the dressings we use to keep it fresh and fun. This has become one of my favourite dressings lately to top these lovely fresh greens.  I like to use both kefir and yogurt in it. Kefir and yogurt, although both fermented milk products, vary in the bacterial cultures they contain. If you want to read more on the differences between the two, this article is great. Cultured/fermented food consumption dates back to ancient times. Great for immunity, gut health, digestion and more, I try and incorporate fermented foods in our diet on a regular basis. (Click here for a great article on fermented foods from Cheeseslave.)   Using kefir and yogurt gives this dressing a big Probiotic punch. Add some fresh herbs from the garden, and you have an awesome nutritional powerhouse to top your fresh greens.
This batch is made with fresh dill


Creamy Probiotic Rich Salad Dressing

¾ cup full fat dairy kefir
¾ cup full fat non-homogenized yogurt
1/3 cup avocado oil

1 tsp Herbamare, or other sea salt of choice
1 tsp coarsely ground fresh black pepper
1 clove minced garlic
½ cup chopped herbs: dill, basil, parsley, chives, cilantro, garlic chives, etc!(pick one or a combo of your choice!)

Measure all ingredients into a 2 cup mason jar. Screw on a metal lid, shake well. Serve on salad of choice. Store leftovers in fridge for 4-5 days.


My Garden :)


Sunday, 15 June 2014

Grain Free Blueberry Orange Coconut Muffins

I don’t do a lot of baking with almond flour anymore; coconut flour has definitely become my grain free flour of choice lately. Although it is a little more finicky to work with, I think for baked goods, the health benefits of coconut flour outweigh those of almond flour. It is also a more frugal flour than almond flour, because you use very little of it as opposed to most almond flour recipes. That being said, almond flour is really lovely to work with, and I still do use it for some things on occasion.

 I was given a bag of sprouted almond meal to play with recently, (thanks Janet!) and have made a few tasty batches of muffins with it so far. These Banana Chocolate Chip Muffins got rave reviews from my co-workers, as did the recipe that I am sharing with you now. Almond meal is a wee bit coarser than the almond flour I usually use, and it does make a difference in the texture of your finished product.  I do, however, really like that this flour is sprouted. Nuts contain something called enzyme inhibitors that can make nuts hard on your digestive system. Soaking/sprouting them reduces these inhibitors, making them easier to digest.  Nut flours are also quite high calorically, so treats made with them should be just that…treats. Great for every once in a while, but not all the time, especially if you are watching your waistline!

There is only one picture of these pretty little muffins. I forgot to take pictures before bringing them into work with me. I did make some co-workers very happy though!

Grain Free Blueberry Orange Coconut Muffins

1 cup sprouted almond meal
2 Tbsp arrowroot starch
½ cup coconut flour
¾ tsp baking soda
½ tsp sea salt
¼ cup coconut sugar
3 eggs
1 tbsp apple cider vinegar
2/3 cup kefir
Juice of 1 orange
Zest of 1 orange (organic!!!)
1 Tbsp coconut oil
---------
½ cup shredded coconut
½ cup blueberries, fresh or frozen

Preheat oven to 375F

Measure all ingredients except coconut and blueberries into an 8 cup mixing bowl. Blend well with an immersion blender, taking care to scrape down the sides if needed to fully incorporate all of the ingredients.
Fold in the shredded coconut and blueberries until nicely distributed.

Spoon batter evenly into 12 paper lined or greased muffin tins. Bake in preheated oven for 20-25 minutes, or until a toothpick inserted in the middle of one comes out clean.

Remove from tin and cool on a wire rack. Store leftovers in a covered container in the fridge for 2-3 days or up to 6 months in the freezer.

Banana Chocolate Chip Muffins :)

Wednesday, 11 June 2014

Grain Free Dairy Free Rhubarb Coconut Bread Pudding


After perfecting my Lovely Grain Free Bread Recipe, using it in a bread pudding was a priority. With being gluten/almost grain free for close to 2 years, desserts like this, as well as the bread that would typically make this, have not been a part of our diet. When my bread turned out so amazingly well, I knew it would make a lovely bread pudding too. 

Our wonderful friends Ken and Ally were coming over for dinner, and I always try and create a decadent dairy free dessert for them. This was definitely a winner. The recipe makes a lot, feel free to half it if you wish. But, as Ally said the next day, it makes a wonderful breakfast, so you may want to make it as is, and share the extras with friends!

I used some nice flaky Maldon salt on the top of the puddings. If you don’t happen to have any, just add sea salt in with the liquids instead.

You won't use the entire loaf of bread with this recipe, the extra slices make nice croutons for a Ceasar Salad ;)


Grain Free Dairy Free Rhubarb Coconut Bread Pudding

3 cups chopped fresh rhubarb (approx 6-8 stalks, depending on size)
½ cup coconut sugar
--------
2 -400ml cans full fat coconut milk
8 eggs
1 tsp vanilla powder or 2 tsp vanilla extract
1/3 cup coconut sugar
2 T Grand Marnier (optional, you can substitute 2 T fresh orange juice and the zest of an organic orange)
1 tsp sea salt (omit if using the salt flakes at the end)
----------
¾ of a loaf of my Grain Free Bread (Get Recipe Here!) you should end up with about 6 cups of bread cubes)
----------
½ cup shredded coconut, unsweetened
----------
Maldon salt flakes (optional, alternately add 1 tsp of sea salt to the coconut milk mixture when mixing)
-------------
METHOD: 

Preheat oven to 350F. Set 14 ramekins (mine hold approx 2/3 cup each, adjust accordingly if yours hold more or less) in baking dishes that will serve as a water bath, and set aside.  (9x13 glass baking dishes work well!) 

Combine the chopped rhubarb and the first amount of coconut sugar, and let it hang out and marinate for about ½ hour.  Stir the mixture a few times while you wait.

Combine coconut milk, eggs, vanilla, coconut sugar and optional Grand Marnier, (and optional salt if not using the Maldon salt flakes at the end), with an immersion blender until well blended.

Slice the grain free bread into 1 inch slices and then cut slices into cubes. 
Stir gently into the coconut mixture, and let hang out for about 5 minutes. Stir in the shredded coconut and the marinated rhubarb, and mix well.
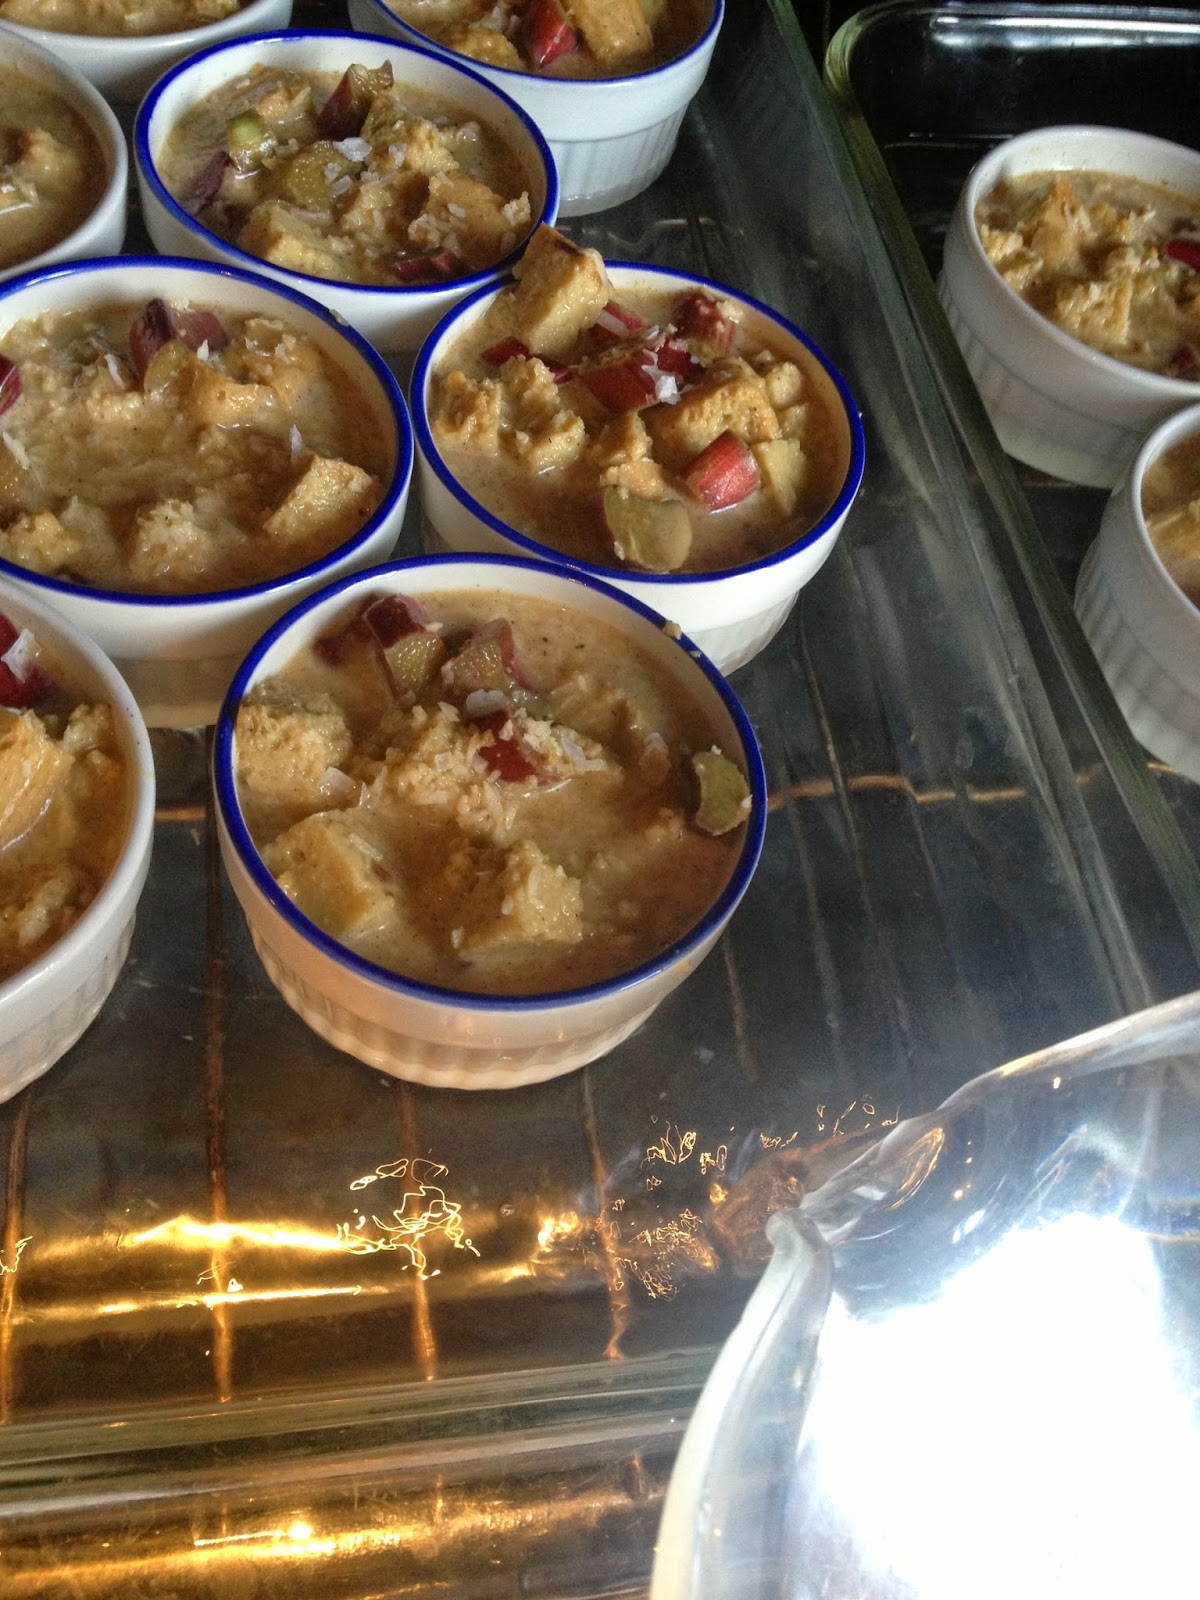
Spoon this mixture into the waiting ramekins. Arrange the ramekins in the baking dishes. Sprinkle the tops of the bread puddings with the Maldon salt flakes if using.

Run your tap water until it is as hot as it will go. Fill a large measuring cup or other pour-able vessel with hot water.
Place the pans holding the ramekins into your preheated oven. Carefully pour the hot water into the pans, surrounding the ramekins and coming just over halfway up the sides of the ramekins.
Bake for 50-55 minutes, or until the puddings are cooked thru. They will lose their liquidy look and firm up when cooked thru.
Let cool before serving. Can be chilled completely, but they are good warm too!

Serve with a dollop of whipped cream if desired. 

Friday, 6 June 2014

Grain Free Sandwich Bread

I will warn you now, this is a long post! But, it is so worth it! This is Grain Free Bread folks! It slices! It lasts at room temperature!(and it actually gets better the next day!) And...it tastes pretty darn good! So bear with the wordiness, and the plethora of pictures. (and the number of exclamation points I may have just used!) I think you can tell, I am really excited to share this recipe!

After embarking on this gluten- free, almost- grain- free journey, bread has all but disappeared from our diets. We were not big sandwich eaters to start with, so lunch packing was never a big issue. Soups, salads and leftovers are our go-to lunches, and this made the transition pretty easy. Our boys were content to have the occasional store bought loaf for when they had a craving for toast.  So it was never anything I put much thought into when creating new recipes. (Actually I did attempt one loaf, from a recipe I found (and promptly lost!) that used only coconut flour, and the resulting brick just “cemented” my decision that life without bread was not such a bad thing!)  But, being as it is probably THE #1 recipe I get requests for above all others, I decided to conquer it, once and for all. It seems to be the one thing most people cannot fathom giving up, and that seems to make or break their decision to stick with this type of diet. So I needed to come up with a tasty, slice-able loaf that would last, preferably without freezing. For those versed in grain free baking, it was a bit of a tall order!

Not one to shy away from a challenge (and this one was a challenge!) I rolled up my sleeves and got to work. I ended up using tapioca starch, an ingredient that I have not played with a lot. It gives this grain free bread the elasticity that is missing using just coconut flour. It is a starch, however, and does contain a fairly high amount of carbs (approx 26g/carbs in ¼ cup) so for those watching carbs and calories, this bread should still be considered a treat, and not a diet staple.  (I roughly worked out the carbs and it rolls in at approx 8-9 g/carbs per slice if you slice the loaf into 14, so not crazy, but again, not a diet staple if you are watching those kind of things) (It does slice thinly very well, you can probably squeeze many more slices out of your loaf…this was just for an example!)

No crumbs!
Enough with the scientific data! If you are OK with using Tapioca starch/flour, you will be very, very, VERY happy with this recipe. (at least I think you will be!) The loaf it makes is not typical bread sized. It is definitely a bit on the shorter side. But what it lacks in size it makes up for in flavour! On the first day, it has a nice crisp crust and a soft, albeit somewhat spongy interior. Day two, after being stored on the counter in a sealed container, the crust becomes slightly chewy, losing its crunch, but not in a soggy bad way at all. It is content to stay on the counter, in a sealed container for 3-4 days, and is almost better on day 3 than day 1, which is pretty cool. (It does seem to mold by day 5 though, just to warn you!) It slices like a dream, hardly a crumb in sight! It makes a lovely sandwich (my friend Robin is curing her own bacon…a BLT party is in the plans!)  and even better French toast. I can’t wait to play around a bit, maybe a cinnamon raisin version? I have used it very successfully for morning toast, croutons, sandwiches, and a very tasty dairy free bread pudding  that I will be posting soon as well(Posted! click on the link). Challenge well met, if I do say so myself :) ***if you scroll to the bottom, I added some pics to show how I use this recipe for Grain Free English Muffins, that are heavenly!!

Grain Free Sandwich Bread

6 eggs, separated
1/3 cup coconut flour
1/3 cup arrowroot flour
½ cup tapioca starch
1/3 cup water, at room temp
1 Tbsp raw apple cider vinegar
1 tsp sea salt
¾ tsp baking soda
1/3 cup coconut oil, melted

Preheat oven to 400 F. Line a loaf pan with parchement (mine measures 9.25 x 5.25 x 2.75 inches, for the cooking time to be the same you will need a similar size) Set lined pan aside for now. (see pictures at the bottom of the post for a tip on lining your pan easier! If you decide to grease your pan instead, grease really really well!)
Place egg whites in stand mixer and whip with whisk attachment until stiff, approx 8 minutes. You don’t want any liquid left in the bottom, or it will make the loaf heavier on the bottom.  (Don’t skip this step, it is very important to the texture of the bread!) (Alternatively use a hand mixer or whisk, but not an immersion blender, it doesn't whip in enough air, the end result will not be the same)
While the egg whites are beating,  measure the rest of your ingredients into an 8 cup mixing bowl and blend well with an immersion blender or a whisk and some elbow grease.
Fold about ¼ of the whipped egg whites carefully into this batter, mixing carefully to combine, but not deflate the volume. Mix in the rest of the egg whites in 3 batches, again being careful not to deflate the egg whites, but combining just enough.
Carefully scrape the batter into the prepared loaf pan, and bake in preheated oven for approx 40 minutes.  
You want to see a nice golden crust. A toothpick inserted in the centre should come out clean.  (bread baking tip from my former baking –with –wheat days, if  you have an instant read thermometer, you want the internal temperature of your loaf to be right around 160F.)
Remove from oven, and lift loaf from pan using parchment. Let cool on wire rack completely before slicing.
Lasts on the counter in an airtight container for 3-4 days. (If it lasts that long without being devoured!) It will have a crisp crust for the first day, and a softer chewy crust after it sits.  I slice any leftovers and freeze, with a piece of parchment or waxed paper between each slice for easy removal one slice at a time)
toasted, served with a tomato and
kale omelet :)

To line a pan with parchment, flip
your pan over, and crease your parchment
paper following the bottom edges of the pan.
Fold them around the ends, kind of like
wrapping a parcel.
Flip your pan back over and your
liner should drop right in your pan! You
may need to re-crease the corners a wee bit to
make the fit nice and snug!


This recipe is a perfect amount to make 8 english
muffins with these awesome little english muffin rings.  
Grease rings well, set on parchement, and bake at 400F
for 16-18 minutes or until they are firm and starting to brown. 

Carefully run a sharp knife around the inside of the rings
to release them, and let cool on a wire rack. They freeze beautifully!
Toasted with a bit of butter and jam...pure grain free heaven!


Friday, 23 May 2014

Grain Free Apple Butter Walnut Cake

I realized today that it has been close to forever since I have posted a new recipe! This seems to happen a lot when I am planning new cooking classes for work. All of my energy and creativity goes into the new recipes for the class, and you, my poor loyal blog fans, are left so deprived!  It is also the beginning of gardening season in southern Ontario where we live, and being an avid gardener, my priorities have definitely been focused elsewhere for the last month or so. Enough with the excuses though, however good they are! I am fixing it here and now, before another minute goes by! 

I made this cake this afternoon, while doing another test run of a new grain free bread recipe that is very (very!)  promising. (I did have some gardening to do but mother nature was not cooperating, so I opted to stay inside!) Both recipes turned out well, but the bread has a few minor issues that I still want to tweak before I post it. (I have to tell you, though, that it stays soft, it slices thin, and lasts for a few days wonderfully as the recipe stands right now…but I will save the rest for another post! It will be worth waiting for, trust me!)

Now, back to the cake! I was initially aiming for something close to a cinnamon bun flavored cake (because grain free dough does not like to roll up!)  But, when I was getting the eggs out of the fridge, the jar of apple butter was staring at me with such aplomb that I knew it wanted to be a part of the cake. Apple butter, in my humble opinion, is such an under-utilized ingredient in the kitchen. It has a much more concentrated apple flavour than applesauce, and lends itself to many different uses in the kitchen. I have made a killer salad dressing, a marinade, and now this lovely cake, all with fantastic results.   Be sure to buy one that has no added sugars, the apples are sweet enough on their own. (Eden makes a lovely one, I highly recommend it!) It would also be divine on a slice of my new grain free bread, toasted, with a slathering of butter…just sayin…

Grain Free Apple Butter Walnut Cake
Batter:
5 eggs
½ cup coconut flour
1/3 cup arrowroot starch/flour
¼ cup chickpea flour
1 tsp baking soda
1 Tbsp Apple cider vinegar
½ tsp salt
1/3 cup coconut sugar
1/3 cup kefir, yogurt or non dairy alternative like cultured coconut yogurt
¼ cup melted coconut oil
--------------------
Topping ingredients:
½ cup chopped walnuts
½ cup apple butter
2 Tbsp coconut oil
2 tsp cinnamon
¼ cup coconut sugar

Preheat oven to 350F
Line an 8x8 glass baking pan with parchment or grease well.  Set aside.
Measure all of the batter ingredients into a medium to large mixing bowl. Using an immersion blender, (or a whisk and lots of elbow grease) mix until very well combined and smooth.
Scrape batter into prepared pan and set aside.
Using  the same bowl, measure the topping ingredients and mix well to combine. Drop spoonfuls of topping evenly around the top of the batter, giving a swirl with a knife to distribute it slightly.
Bake in preheated oven for 35-40 minutes, or until a toothpick inserted near the middle comes out just clean.

Remove from oven and cool before cutting and serving. 

Monday, 21 April 2014

Grain Free Refined Sugar Free Blueberry Breakfast Cake

Somehow I ended up with 2 tubs of dates in my pantry. Not a bad thing, necessarily, but I didn't want them to go to waste. I generally don't need an excuse to bake, but this was a good one!

Dates make an awesome natural sweetener, being on the lower end of the glycemic index (I believe they are a 9) means less of a blood sugar spike, great if you happen to be diabetic. They are also rich in polyphenols  and fiber, making them a smart alternative to refined sugars that bring nothing to the table but sweet!

This cake is lovely for breakfast. (or any time of the day for that matter!) Moist and flavourful, it is not overly sweet, and virtuous enough in its ingredients to make having cake for breakfast an OK thing. (My blueberry shunning teen even packed two pieces in his lunch today, a definite seal of approval!)

The batter is made, start to finish, in the food processor.  If you don’t have one, I might suggest that you soak the dates to soften them, and whiz them with the banana and other liquid ingredients in your blender, pour into a mixing bowl and proceed with the recipe from there.

Grain Free Refined Sugar Free Blueberry Breakfast Cake

6 Medjool dates
2 ripe bananas
4 eggs
1/3 cup yogurt or kefir
1 tbsp apple cider vinegar
1/3 cup softened coconut oil
1/3 cup coconut flour
2 Tbsp chick pea flour
2 Tbsp arrowroot powder
1 tsp baking soda
¾ tsp salt
1 tsp cinnamon
-------
Topping:
Generous ½ cup blueberries (fresh or frozen)
Cinnamon to sprinkle

Preheat oven to 350F. Slice the dates open and take out the pit. Line an 8X8 glass pan with parchment.
Place pitted dates and peeled bananas in the bowl of a food processor. Process until the dates and bananas make a nice smooth puree. Small bits of date are ok.
dates and bananas

Add the rest of the ingredients and process again until you have a nice smooth batter. Scrape into parchment lined pan and smooth the batter into the pan.
a sprinkle of cinnamon
Scatter the blueberries evenly on top of the batter and lightly press down. Sprinkle with a light coating of cinnamon to taste, I probably used around ½ -1 tsp.

Bake in preheated oven for 35-40 minutes or until a toothpick inserted into the middle comes out clean.
Remove from oven, and carefully lift the parchment paper out of the pan and place on a wire rack to cool.

Store leftovers in a sealed container at room temperature for up to 2 days. If it lasts longer than that in your house, store it in the fridge for up to 4 days.


Monday, 14 April 2014

Rosemary Roasted Parsnip Fries

As many of you know, Jim and I are avid gardeners.  Having our own veggies and herbs just steps from our back door is one of our favourite things, and we try and make the most of our Canadian growing season. We have pulled carrots and parsnips, in years past, well into January, and, when we have planted enough kale, have pulled kale just before Christmas. This year, however, the winter cold came on early and hard, leaving a bunch of carrots, beets and parsnips unharvested. The ground was just too hard to get them out, and we mourned the loss of the last of our small root crops as we watched the snow get deeper… and deeper… and deeper.  
who knew a pressure
washer was such an
effective veggie scrubber ?
Fast forward to this past weekend. After a very long, very cold winter that seemed it would never end,  we were gifted with a warm spring Sunday that just begged to be spent out of doors. Even though rain threatened off and on all day, and the wind tried its best to blow us down, we spent most of our time in the yard and garden getting things ready for spring planting. When I pulled the dead foliage from the  parsnip bed, I was surprised to see little green leaves sprouting in nice tidy rows. (I have, in past years pulled a few stray parsnips out of the ground in the spring, but they were few and far between, and not very edible looking to say the least.) Not  expecting much, I dug the pitchfork out of the shed, and proceeded to dig up part of a row. When these marvelously perfect parsnips emerged from their earthy home, I was tickled pink! Dinner plans were quickly revamped to include these beauties. Nothing beats garden to table eating, and having this surprise spring harvest made it that much better.  I think Overwintering parsnips will become part of our garden plan every year!
These "fries" have a nice spicy undertone, and a lovely texture. They were a  perfect side for our rotisserie chicken and Bacon Scalloped Potatoes. (that recipe will be posted soon!)

Rosemary Roasted Parsnip Fries
Approx 9 parsnips, scrubbed and/or peeled
 1 ½ tsp dried rosemary
¾ tsp smoked sea salt or other sea salt of choice
Fresh ground black pepper to taste
2 tbsp melted coconut oil

Preheat oven to 400F
Scrub parsnips well, peel if desired.  Cut into 3-4 inch lengths, and then cut lengthwise into “fry” sized sticks.  (the smaller you cut them the quicker they will cook, ours were on the chunky side) Toss in 11”x15” glass baking dish (or a parchment lined baking sheet, cooking time may vary) with oil, rosemary, salt and pepper.
Roast for 20 minutes, stir and roast again for approx 15 minutes or until they start to brown and crisp. Serve hot!