This blog is all about Food. Real Food. Food that Nourishes, Heart and Soul.

Real Ingredients, Organic and Locally sourced whenever and where ever possible, shared with love.

No packages, no ingredients that are impossible to pronounce.

Real, honest food, from my kitchen to yours. Enjoy!

Sunday, 30 June 2013

Grain Free Apricot Coconut Muffins with a Honey Lime Drizzle


 Fresh apricots, to me, always taste like sunshine. Probably because they arrive at the height of summer, and their colour is so brightly perfect for the season. I love the fresh and tangy- sweet tartness when they are fresh, but baking them takes these little darlings to a whole new level.  I brought home a bag from work this week, and had planned to make some kind of apricot upside down cake with them. But, being as I ended up wide awake and in a baking mood bright and early on Sunday morning, they ended up in a muffin instead, because I just couldn't justify having cake for breakfast!

The honey lime drizzle is optional, but tasty. Leave it off if you wish, but it really is the proverbial “icing on the cake” , or in this case, muffin!
**recipe is updated, it was meant to say baking SODA, not powder!

Grain Free Apricot Coconut Muffins with a Honey Lime Drizzle
Muffin base:
6 eggs, preferably pastured
¾ cup coconut flour
2/3 cup kefir or yogurt
¾ tsp salt
1 tsp baking powder  SODA! **
1/3 cup honey
1 tsp vanilla
¼ cup melted coconut oil
Add ins:
1 cup diced fresh apricots (approx 4-5 apricots, depending on the size)
½ cup shredded coconut
Drizzle:
In a small bowl, mix together:
2 tbsp honey
2 tsp lime juice
2 tsp hot water

Preheat oven to 350F.
Whiz the base ingredients together in a mixing bowl with a stick blender until well blended. Let stand for a few minutes for the coconut flour to thicken up. Mix in the apricots and coconut with a wooden spoon until well incorporated.
Spoon evenly into muffin tins lined with papers, mine made 12.
Bake in preheated oven for 22-24 minutes, or until a toothpick inserted in the middle comes out clean.  Remove from oven, and while muffins are still in the pan and hot, drizzle with the honey lime mixture. Let hang out in the pan for about 5 minutes and then remove to a wire rack to cool.

Keep them in the fridge after the first day, or freeze. (if they last that long!)

Friday, 28 June 2013

Sweet and Sour Sloppy Slaw


I made this recipe from one of my Real Simple magazines a few weeks ago, and while it was good, it was needing some tweaking for our tastes.  We don’t eat wheat, so the buns had to go, and we found it really salty. So, I tweaked a bunch and this is what I came up with.  It morphed into a salad of sorts, and received great reviews from my teenage test kitchen.
If your ground beef is thawed, it can be on the table in about a half an hour. I recommend making the coleslaw part first so the flavours can combine while the beef cooks.  I added the Arame, a sea vegetable, for a nutrient boost. It can be left out if you are feeding less than adventurous eaters! (I have been adding sea vegetables to everything lately, they up the trace minerals and nutrients of any recipe without altering the taste.

Sweet And Sour Sloppy Slaw

Cole slaw:
4 cups shredded cabbage
3 carrots, grated
1/3 cup chopped cilantro
2 tsp toasted sesame oil
Juice of one lime
1 ½ tbsp olive oil
Pinch of salt
2 tbsp sesame seeds

Ground beef:
1 tbsp coconut oil
1 lg onion, chopped
1 clove garlic, minced
½ cup pre-soaked Arame, drained
1 inch knob of ginger, grated
1 lb grass fed ground beef
2 tbsp Bragg's Soy Seasoning
½ can of small can of tomato paste
2 tbsp coconut sugar
½ cup water

For Coleslaw:
Toss all ingredients in a large bowl, and mix well. Set aside at room temp to marinate while you make the ground beef part;


Ground beef:
Sauté onion in coconut oil for 2-3 minutes over medium high heat in a large cast iron pan. Add the ground beef, using wooden spoon to break it up as you stir. When it is almost cooked thru, 6-8 minutes or so, add the rest of the ingredients, stirring to combine. Let cook until the ground beef is completely cooked and the liquid is mostly absorbed, another 4-5 minutes.
Serve the hot beef on top of the coleslaw.


Thursday, 20 June 2013

Strawberry Rhubarb Custard

My Grandma Pringle made the best rhubarb pie EVER. Seriously. Of anything I remember her cooking for us, that is the one thing that conjures up memories of her kitchen (there was also an unfortunate chicken liver incident, but we won’t talk about that one, ‘K?) Back to the pie. Whenever I asked for the recipe, her answer was always , and I think I quote, “oh, a little of this, and a bit of that” but never a full recipe to work with. At the time I always thought it was a closely guarded secret recipe, but I now have my suspicions that she, like me, wasn't much of a recipe follower. Sometimes great food just happens, and I think that was the case with the pie.  I tried to recreate that elusive pie over the years, and although some came close, nothing ever quite captured the essence of her pie.  Now that I am grain free, I have sadly  put thoughts of pies out to the proverbial pasture, as grain free pastry is proving to be a very tricky thing, and although I am trying, I have yet to perfect a blog worthy version.  Now perfected!! follow this link for my Grain Free Pie Pastry!
Fast forward to this past Saturday. I was out shopping and just could not resist buying a bag of beautiful organic rhubarb from the Scotscraig Farm Veggie stand that is at Fenwoods during  the vegetable garden season. I have rhubarb in my garden, but due to a last minute transplant, it has been too small to do anything with. Buying my first real rhubarb of the season made me sadly nostalgic for my grandmas pie all over again, and it was relegated to the fridge while I sulked. 


 Driving home from work tonight though, I had one of those kitchen epiphany moments. The best part of Grandma's pie was not the pastry. Although it was good, the creamy rhubarb studded custard was always the shining star of the pie. So, why not just recreate the filling?  Pastry is just a vehicle for the interior of the pie anyway. Home to the kitchen I flew, to rescue the rhubarb from my fridge.  I added some organic strawberries, which sometimes made an appearance in Grandmas’ pies, and I think I hit the nostalgia nail right on the head.  If I close my eyes and take myself back 30 years, I can almost imagine sitting at her big wooden dining room table, surrounded by family after a big dinner, sinking a fork into a piece of her pie. I think she would like my crust-less version, and I know she would be proud that her cooking techniques are alive and well in me.

Strawberry Rhubarb Custard

4 cups rhubarb, chopped
2 cups sliced strawberries
3 Tbsp arrowroot starch
6 eggs
1/3 cup coconut sugar
2 cups whole milk
1 tsp vanilla powder** or 2 tsp vanilla extract

Preheat oven to 375F
Place chopped fruit in a 9 x 13 glass baking dish. Sprinkle the arrowroot on top of the fruit, and stir to coat the fruit.
In a separate bowl, whisk the eggs, and add the coconut sugar, milk and vanilla. Mix well to incorporate.

Pour over fruit mixture and bake in preheated oven for 40-45 minutes or until the custard is set in the middle. Let cool slightly and serve warm, or chill thoroughly and serve cold.

**Organic Traditions has an organic vanilla bean powder that I love to use in baking. Substitute an organic vanilla extract if you wish!

Sunday, 16 June 2013

Grain Free Coconut Hemp Banana Chocolate Chip Muffins

In my house right now, I am feeding two bottomless pit teenagers, who are both becoming increasingly aware of why we eat the way we do, which is both amazing and gratifying to watch. That being said, finding healthy food to fill and sustain them can sometimes be a big challenge. Their taste buds, as well as their acceptance of “healthy” treats, have been evolving over the last year, and they are now easier to feed the way we eat, but not easy to keep full.  (don’t lose heart if you are trying to transition reluctant eaters to a healthier lifestyle, perseverance is key, it will pay off, trust me!) I have been doing a lot of baking with almond flour since switching to a grain free lifestyle, but with the amount the boys eat, it can be very expensive!  I bought a bag of hempseed flour at Goodness Me, and made these muffins with it.

They combine coconut flour with hempseed flour and make a nice moist muffin at a fraction of the cost of almond flour. Hemp (not that hemp!!) is a nutritional powerhouse that provides fiber  omegas, and protein, and a host of other benefits. It is also is very environmentally friendly and green. The more research I do, the more I want to incorporate hemp products (not that hemp!!) into our daily lives.


Grain Free Coconut-Hemp Banana Chocolate Chip Muffins

2 very ripe bananas (mine were fairly large)
4 pastured eggs
2 tsp vanilla
1/3 cup kefir or plain yogurt (full fat!)
1 Tbsp Apple cider vinegar
½ cup coconut flour
¼ cup hemp flour
2 Tbsp coconut sugar
1 tsp baking soda
¼ cup coconut oil, melted
Pinch of salt
½ cup chocolate chips (Enjoy Life are awesome)

Preheat oven to 350F
In a large mixing bowl, (or a blender) combine the bananas, eggs, vanilla, apple cider vinegar and kefir together well with an immersion blender. Blend till very well combined and a bit frothy. Add all of the dry ingredients except for the chocolate chips, and blend again until well combined. Let stand for a few minutes to thicken up a bit. Fold in the chocolate chips, and divide evenly between 12 muffin tins (well greased or lined with papers (I like this brand!!)
Bake for 25-30 minutes in preheated oven, or until toothpick inserted in center of a muffin comes out clean.  Remove from oven and let stand in pan for 5 minutes. Remove to cooling rack and cool (at least slightly!!) before eating.

Tuesday, 11 June 2013

Bruschetta Egg Skillet with Spinach and Fresh Basil

I made this for my oldest son one night for a quick dinner, when he said he had no time to eat before driving school. I literally had it on his plate within 7 minutes flat. I remade it for my hubby for brunch on one of our days off together, and remembered to take  pictures so I could post it. The Bruschetta topping is a recipe that I used in the first cooking class that I taught at Goodness Me. I shared this idea with the class, because the Bruschetta topping is so versatile, it pays to make extra.

Bruschetta Egg Skillet with Spinach and Fresh Basil

3 cups roughly chopped organic baby spinach
1 tbsp coconut oil
1 tbsp butter
6 eggs
½ tsp Herbamare or sea salt of choice
½ cup Bruschetta mixture (recipe below)
¼ cup freshly grated Parmesan cheese
2 tbsp Chopped fresh basil (or sub other fresh herbs of choice, garlic chives would be awesome!)

Beat eggs in a medium mixing bowl, add Herbamare and stir to combine. Set aside
Preheat broiler to high, and move  rack to the upper half of the oven.
Heat oil and butter in a medium to large cast iron (or other oven safe) pan over medium high heat. Sauté spinach until wilty, 1-2 minutes. Add beaten eggs, and let cook undisturbed for a few minutes. Using a wooden spatula, tip the pan slightly and pull the cooked egg back from the edge of the pan, letting the uncooked egg run underneath. Repeat around the pan a few times, until the eggs are almost set on top, this should take just a few minutes.
Remove pan from heat. Spoon the Bruschetta mix evenly around the pan on top of the almost cooked eggs, top with grated cheese, and place under broiler until the edges of the egg are starting to brown nicely, and the cheese is just starting to bubble. Keep an eye on it at all times, you don't want it to burn!!


Remove from broiler (remember the handle will be hot!!!) and cut into 4 wedges in the pan. Remove each wedge to a plate and top with chopped herbs. Serve hot and enjoy!

Bruschetta Topping

1 410g can diced tomatoes, drained well
1 tbsp olive oil
1 small clove of garlic, minced
1 tbsp chopped fresh basil (or 2 tsp dried)
¾ tsp salt
Grind of fresh black pepper
Splash of balsamic vinegar

Topping Directions:
Drain tomatoes well, add other ingredients and stir well to combine.  Let stand for ½ hr for flavours to meld. If using dried basil, let stand closer to an hour for the basil to rehydrate.

Friday, 7 June 2013

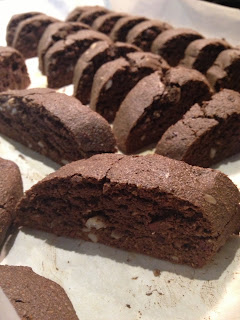
Grain Free Chocolate Macadamia Biscotti

This is one of my favourite grain free cookies. I think I have said that about every grain free cookie that I have made to date, BUT THIS TIME I REALLY MEAN IT! Grain Free Biscotti has an added bonus: they store better than any other grain free cookie I have made. (most need to be stored in the fridge after the first day to have them last, and they lose their crispness fairly quickly).  I have had these in the cookie jar for up to a week at home. They may not be quite as crisp as an authentic biscotti, but for a storable grain free cookie, this is “da bomb!! “

 I originally made these for  the dessert portion of my Grain Free Italian Cooking class that I taught, but ended up subbing in an Orange Walnut Date version instead. It was a tossup for which one to use in the class, but my taste testers chose the Orange Walnut Date version (by only a small margin though! I  promised the class that I would post this recipe soon on the blog, but it meant making another batch, because I hadn't taken a single picture of them. Any excuse for me to make more cookies, lol! 

These ones differ a bit from the other recipe in that they have nut butter in them as well as the nut flours. I have used both almond butter, and sunflower butter in them, it doesn't  make much difference in the end product at all. So use whatever  nut butter you have on hand, just make sure, whichever one you choose, that it is not sweetened.  

Grain Free Chocolate Macadamia Biscotti
2 eggs
2/3 cup nut butter
1/2 cup strongly brewed coffee (or water if desired)
1/3 cup melted coconut oil
2 ½ tsp vanilla
1 cup almond flour
½ cup coconut flour
1/3 cup cacao powder
½ cup sprouted milled Chia- Flax mix (Organic Traditions has a nice mix)
1/3 cup coconut sugar
3 tbsp arrowroot
1 tsp baking soda
1 tsp salt
½ cup cacao nibs (or sub chocolate chips)
1/2 cup chopped macadamia nuts 

Preheat oven to 375F.
In a large mixing bowl, blend together the nut butter, eggs, coconut oil, coffee and vanilla with an immersion blender until well combined. Add the rest of your dry ingredients EXCEPT the cacao nibs and the macadamia nuts. Mix well to combine all the ingredients. Your dough will be fairly thick and sticky. Add the nibs and nuts, and mix again to evenly distribute them thru the dough.
Divide your dough in 2 equal pieces and shape into 2 logs on a parchment lined cookie pan. I find forming the logs with my hands slightly wet the best way to shape them. Your logs should measure about an inch high and just about 2 inches wide (ish, just go for a nice even log shape, trying to keep the ends from being too thin or squished)
Cut into 1 inch cookies
Bake your logs in the preheated oven for 20 minutes. Remove from oven and lower temperature in oven to 325. Cool cookies on pan for 10 minutes. 
Cut  into cookies with a very sharp knife, approx 1 inch wide( when cutting, use more of a guillotine motion than a  slicing motion, as the cookies may crumble with the back and forth motion) . Stand up on cookie sheets  and bake for another 20-22 minutes until dried and “biscotti” like.  They should be fairly dry to the touch on the cut sides of the cookies.

Remove cookies from pan to a cooling rack and cool before serving.

unbaked dough
These cookies store well at room temperature for approx 1 Week, if they last that long J
once baked dough

Saturday, 1 June 2013

Savory BBQ Chicken


We use our BBQ a lot. It is not a seasonal cooking device in our house, it is used year round, and for much more than just grilling steaks.  (I have used it for everything from baking bread, muffins, pizza and even cookies in it, prior to my grain free days) I think of it as an outdoor oven for those hot summer days when you just can’t bear the thought of heating up the house with your oven.  It also lets you get away with less dishes to clean up, which is always a bonus in my kitchen!!
I cooked this chicken using an indirect heat method on the BBQ. Heating up the entire BBQ  and then turning off the heat below whatever you are cooking, and leaving the outside burners on ensures a nice juicy piece of chicken. Ours has 3 burners, making this method of cooking work beautifully. These cuts of chicken are typically fatty, and when combined with the marinade can cause flare ups on the BBQ.  This method creates a wonderful smoky flavoured BBQ chicken with minimal flares. ( If you don’t have a BBQ that will work for this method it would also work in the oven, I would bake it at 375F for about 45 minutes.)

Savory BBQ Chicken

¼ cup Organic Worcestershire Sauce
2 tsp toasted sesame oil
3 Tbsp tomato paste (**see below for a tomato paste tip)
1 tbsp coconut sugar
1 tsp grated or minced fresh ginger
1 clove garlic, minced
½ tsp cinnamon
¼ tsp cloves
1 tsp freshly ground black pepper
¾ tsp Herbamare or sea salt of choice 
4 chicken leg quarters, cut apart into drumsticks and thighs to make 8 pieces

Mix all ingredients together well. In a large bowl or zip style bag,  place  marinade and chicken pieces. Toss to coat. Refrigerate for at least one hour (or up to 12 hrs).
Preheat BBQ grill on high for 10-15 minutes until nice and hot.  Place chicken pieces on middle of grill, skin side down to sear for 1-2 minutes. Flip over and turn off heat underneath the chicken pieces, and turn the burners on either side down to medium. Close BBQ and let cook with the indirect heat for approx 45 minutes or until the juices run clear when the chicken is cut open. (instant read thermometer should read 165F) Serve hot!
Pictured with Grain-Free Battered Cauliflower
Marinate in Bag for at least one hour


**when using the little cans of tomato paste, I like to freeze the leftovers in 1 tbsp amounts in an ice cube tray. When frozen, remove from tray and store in a freezer bag until needed!