This blog is all about Food. Real Food. Food that Nourishes, Heart and Soul.

Real Ingredients, Organic and Locally sourced whenever and where ever possible, shared with love.

No packages, no ingredients that are impossible to pronounce.

Real, honest food, from my kitchen to yours. Enjoy!

Showing posts with label Beef. Show all posts

Tuesday, 8 April 2014

Leftover Beef Skillet Supper

This was one of those improvisational dinners that turned out really well. Thumbs up from the teenagers, fast and frugal. Win Win Win!
When I make my bone broth, if my beef bones are meaty enough, I pull them out at the 10 or 12 hr mark, pull off the cooked beef, and put the bones back in for the rest of the time. The beef, by this time is lovely and tender, and is usually enough for an entire meal. I like to buy my beef stock bones from Oakridge Acres. I "stock" up(pardon the pun!) whenever we go out there to shop. They are meaty and big, and considering all of the wonderful goodness you get from them, a very frugal purchase. Two packages generally make about 10 cups of bone broth, and a meal from the pulled meat. For under 4$ a package, it helps to balance out the rest of our food budget.
I love my cast iron skillets for dishes like this, a quick saute and they can go straight in the oven, giving you time to toss a nice green salad and whip up some dressing, like this maple balsamic that is one of our faves! Feel free to substitute any leftover beef or chicken in this recipe, its a great way to use up leftovers!

Leftover Beef Skillet Supper

1 large red onion, peeled and chopped
1 tbsp coconut oil
3 cloves garlic, minced
1 tsp dried thyme
1 tsp sea salt or zesty Herbamare
1 cup Beef Bone Broth
1 796ml can of diced tomatoes (look for BPA free cans!)
4 cups pre-cooked beef
1 1/2 cups grated cheddar cheese

Preheat oven to 400F
Heat coconut oil in a large cast iron pan over medium high heat until melted and hot. Saute the onion for 3-4 minutes, stirring often. Add the garlic, thyme and salt. Saute for another 2 minutes. Add the tomatoes and beef, and stir well to combine. Top with grated cheese and using an oven mitt (cast iron handles get hot!!) place in hot oven. Bake for approximately 35 minutes or until the cheese is melted and slightly browned. Remove from oven and serve hot, with a nice tossed salad.


Monday, 24 February 2014

Braised Beef Shanks with Root Veggies, and a Cool Way to Peel Garlic!

When I have a day off, chances are at some point you will find me in my kitchen. Today was no exception. We brought home some beautiful beef shanks from our last trip to Fenwood Farms, and I took them out to thaw yesterday, knowing that today would be a perfect day to put the oven on for a long braise. This cut of meat does beautifully with a long cooking time, along with something slightly acidic added to the cooking liquid. I used some apple cider vinegar, along with a cup of red wine. This helps to break down the tough connective tissues that are typical of this cut of meat.  Beef shanks are generally a cheaper cut, with 3 large shanks providing 6 meals for right around 20$, not including the veggies etc.  Frugal, tasty and nutritious, all in one pot.


Braised Beef Shanks with Root Veggies

3 Beef Shanks (3-4 lbs total weight)
2 tbsp coconut oil, divided
1 lg onion, chopped
4 carrots, chopped
5 parsnips, chopped
1 stalk celery, chopped (I used a handful of small ones)
1 head of garlic, peeled and diced (***see amazing garlic peeling tip below recipe!!)
1 tsp each dried rosemary and thyme (I used fresh rosemary, increased to 2 tsp)
1 cup dry red wine
3 tbsp apple cider vinegar
3 cups bone broth (beef would be best, I used turkey, and it worked fine)
Salt and pepper to taste
3 bay leaves

Preheat oven to 375

Make sure all of your veggies are prepped  before proceeding with the recipe!
In a large oven safe pot with a lid (an enameled cast iron dutch oven is perfect), heat 1 tbsp of the coconut oil and brown the beef shanks over medium high heat, one at a time if necessary (don’t crowd them, you want them to brown not steam) for about 3 minutes on each side. you want to see some nice browning. (turn on the fan in your range hood if you have one, it can get a bit smokey!)
Remove the shanks to a plate and set aside.

With the pot still on the burner, add the second tbsp of coconut oil, and add the chopped onion, carrot and parsnips. Saute for 4 minutes, stirring often.
Add the celery, herbs and garlic, and season with salt and pepper. Saute for 2 minutes more.

Add the wine slowly, ¼ cup at a time, to deglaze the pan. Scrape any browned bits from the bottom, adding the rest of the wine, it will reduce slightly as you go.
Add the apple cider vinegar, and the bone broth, and stir to combine. Carefully nestle the beef shanks into the pot, submerging as much as possible. Tuck the bay leaves around the pot, cover, and place in preheated oven.


Bake for 2 ½ hrs. Remove the lid and bake for another 20 minutes. Remove from oven, remove bay leaves  and serve warm!


Amazing Peeled Garlic!

A while back, we saw a certain Ms. Stewart peeling whole heads of garlic using two stainless steel bowls, and just a quick shake. It works like a charm, and although it is slightly noisy, the garlic cloves come out beautifully peeled.  After a random search on Pinterest (I am more than slightly addicted to that site!) and one martini shaker later, beautifully peeled garlic is even easier!!!
Simply break up the head of garlic, put the whole thing in the martini shaker, put the lid on and shake like you would a martini, back and forth maybe 10 times. Voila!!  Your garlic is peeled, and ready to go!


Friday, 28 June 2013

Sweet and Sour Sloppy Slaw


I made this recipe from one of my Real Simple magazines a few weeks ago, and while it was good, it was needing some tweaking for our tastes.  We don’t eat wheat, so the buns had to go, and we found it really salty. So, I tweaked a bunch and this is what I came up with.  It morphed into a salad of sorts, and received great reviews from my teenage test kitchen.
If your ground beef is thawed, it can be on the table in about a half an hour. I recommend making the coleslaw part first so the flavours can combine while the beef cooks.  I added the Arame, a sea vegetable, for a nutrient boost. It can be left out if you are feeding less than adventurous eaters! (I have been adding sea vegetables to everything lately, they up the trace minerals and nutrients of any recipe without altering the taste.

Sweet And Sour Sloppy Slaw

Cole slaw:
4 cups shredded cabbage
3 carrots, grated
1/3 cup chopped cilantro
2 tsp toasted sesame oil
Juice of one lime
1 ½ tbsp olive oil
Pinch of salt
2 tbsp sesame seeds

Ground beef:
1 tbsp coconut oil
1 lg onion, chopped
1 clove garlic, minced
½ cup pre-soaked Arame, drained
1 inch knob of ginger, grated
1 lb grass fed ground beef
2 tbsp Bragg's Soy Seasoning
½ can of small can of tomato paste
2 tbsp coconut sugar
½ cup water

For Coleslaw:
Toss all ingredients in a large bowl, and mix well. Set aside at room temp to marinate while you make the ground beef part;


Ground beef:
Sauté onion in coconut oil for 2-3 minutes over medium high heat in a large cast iron pan. Add the ground beef, using wooden spoon to break it up as you stir. When it is almost cooked thru, 6-8 minutes or so, add the rest of the ingredients, stirring to combine. Let cook until the ground beef is completely cooked and the liquid is mostly absorbed, another 4-5 minutes.
Serve the hot beef on top of the coleslaw.


Friday, 19 April 2013

Crock Pot Roast Beef


I love my crock pots. I have two that I use quite often for all kinds of things, and I love how easy they make dinners on days that I know I will be pressed for time. This roast technique takes a wee bit of prep time, but it is worth it for the flavour at the end.  The roast I purchased was a sirloin tip, which worked really well with this technique. Top or bottom round would work well too for this long slow cooking method. It is perfect for the cheaper cuts, which helps with the weekly budget!


Crock Pot Roast Beef

3 large carrots, peeled and chopped
2 onions, peeled and chopped
3 parsnips, peeled and chopped
4 potatoes, chopped
4 cloves garlic, halved
1 roast of beef, thawed, approx 3-4 lbs
2 tbsp coconut oil
Salt and pepper to taste
2 cups beef bone broth

Fill the bottom of your crock pot with the chopped vegetables.
Browning the roast
Melt the coconut oil in a lg cast iron pan over medium high heat. Season roast with salt and pepper, and sear it on all sides in the hot pan, about 2-3 minutes per side.  
Place in crock pot on top of the vegetables.
Deglazing the pan with frozen
beef bone broth

Deglaze your pan with the beef bone broth, (mine was frozen as you can see in the picture) cooking over medium high heat while scraping all of the browned bits from the bottom of the pan.
As soon as it starts to boil, pour the pan contents over the roast and veggies in the crock pot, cover, and cook on low for 8-10 hours, or on high for 4-6 hours.
Ready to eat!
Enjoy the smell when you come thru the door after your long day at work! Toss a quick green salad and dinner is served!

Wednesday, 10 April 2013

Beef And Spinach Soup With Thyme

I am always looking for ways to use up leftovers, and they often end up in a soup of some kind.  With a leftover protein and some veggies, plus a freezer full of bone broth, a nourishing soup is easy to throw together quickly.

Beef And Spinach Soup With Thyme
1 small- ish red onion, diced, mine yielded about ¾ cup
1 ½ cups chopped mushrooms
3 stalks celery
2 cloves garlic
1 1/2 cups leftover cooked grass-fed beef, shredded or sliced in thin bite sized pieces
4 cups beef bone broth 
Bundle of thyme **(see below for pictures) or 1 tsp dried
3 cups baby spinach
Salt and pepper to taste

Sauté the onion, mushrooms, celery and garlic over medium high heat, stirring often until the veggies start to brown and the bottom of the pot looks like this: 


Add broth, thyme bundle and beef. Bring to a boil, reduce heat, cover and simmer for 20 minutes or until the veggies are all tender.
Turn off heat, remove the thyme bundle, add the spinach and stir until it wilts. Season with salt and pepper and serve hot.


Bundle the thyme with butchers twine


if you cover your thyme in the garden
 you can pick it fresh all winter :)

Friday, 29 March 2013

Grass Fed Beef Burgers Without the Bun :)


When you take most grains out of your diet, you may often wonder if you will ever be able to eat some of your favourite foods again. Enter the humble lettuce leaf…we have used them as wraps, sandwich bread, Sloppy Joe vessels, and burger buns.  After the initial weirdness wears off, you won’t miss the bread at all. Romaine and green leaf lettuce seem to work the best, you need a lettuce with a bit of  body to it. Just be prepared for some mess, they are not the neatest things to eat!!

A lot of home made burgers have bread crumbs in them, I find them to be way juicer without. Give it a try! I don't think you'll miss them anymore than you miss the buns!

Grass Fed Beef Burgers

1 pastured egg
1 tsp grainy organic mustard
1 clove organic garlic, minced
2 tsp dried organic oregano
¾ tsp Herbamare or other unrefined sea salt

Mix all ingredients together, I find it easiest to use my hands to get everything well incorporated. Divide into 4 even pieces and shape into evenly thick patties. Cook over medium heat on a preheated bbq grill or over medium high heat in a nice hot cast iron pan with a bit of coconut oil. Cook on the first side for 6 minutes, and then flip and cook for another 3.
Serve hot between lettuce leaves, topped with your choice of toppings. We topped it with a nice slice of raw cheddar,  some sautéed organic mushrooms and onions and a dollop of the organic grainy mustard.

Wednesday, 20 March 2013

Bone Broth 101, My Method!

You will notice that I refer to Bone Broth in a lot of my recipes.  Just what is bone broth, you ask? Can’t you just substitute a store bought tetra pack of chicken or beef broth, you ask? What about those fancy little foil wrapped cubes? If you are a purist like me, the answer is unequivocally no!! Even in the best organic boxes of “stock” you will find undesirable ingredients. (I am still trying to figure out why they need to add “natural beef flavour” and “caramel colour” to something so simple, and that is just the tip of the iceberg when it comes to the additives I have read on labels!) Not to mention, homemade broth just tastes better. Homemade chicken bone broth is the go to remedy in our house when anyone is feeling a little under the weather.  And it really is not hard to make. I have made my own broth for years, although the way I make it has changed in the last few years. I do still keep baggies in my freezer for the leftover poultry bones, and organic veggie peelings and trimmings (garlic, onion, celery, carrot etc.), When the baggies are full, I toss them in the crockpot. Because, hey, the only thing better than making your own nourishing broth is making it for FREE, out of what would normally be tossed in the trash!  (I should mention here, when we shop at Fenwood Farms, they offer a bag of chicken stock bones for free with every purchase) I usually buy my beef soup bones at Oakridge Acres, one package usually costs me around 3$. Two packages usually net me about 12 cups of bone broth.

Now that beef is back in our diet, beef bone broth has become a favourite of mine. I use it in soups, stews, for de-glazing pans, as a nourishing hot beverage, etc.  The process, however, changed after reading Nourishing Traditions. Bone broth contains an amazing amount of trace minerals, calcium and magnesium just to name a few. (read more about the many awesome benefits HERE) Like I said, I am a purist though, and prefer to keep my stock simple, using just the grass fed beef soup bones, and not the vegetables like some use. Completely a matter of choice though! (I do sometimes add the veggies to my chicken broth, but it does change the flavour) To make chicken bone broth, simply substitute chicken bones for the beef bones, the method is essentially the same.

My Method:

For this you will need a large slow cooker, and depending on the size, a package or two of beef soup bones and some raw organic apple cider vinegar (this helps release the nutrients from the bones). I usually try and have my large crock pot about half full of bones.
  • Place bones into crock pot 
  • Top up your crock pot with water  
  • Add a few TBSP of a raw organic apple cider vinegar 
  • Turn on to low, cover and leave it for at least 24 hours (up to 30 ish max)
  • At the 8 or 9 hour mark, if the bones are particularly meaty, I will pull them out, remove the meaty parts, and throw the bones back into the crock pot to continue cooking. This meat can then be used as part of another meal, making the broth even more frugal 
  • At the end of the cooking time, remove the larger bones, and strain the broth thru a fine mesh strainer to remove any small bone fragments  
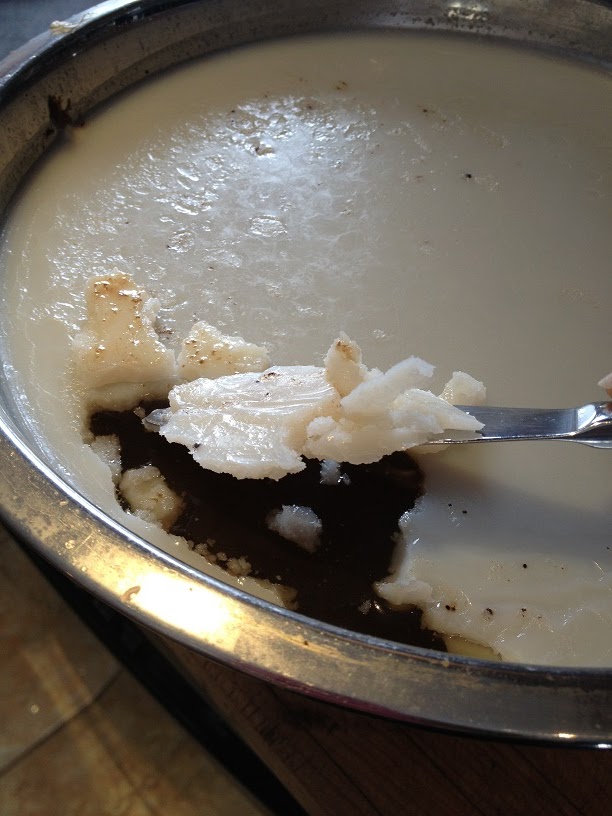
  • Chill the stock until it gels and the fat solidifies  
  • Remove the fat layer from the top  
  • Use the broth either right away, or freeze in your choice of serving sizes. I like freezing about 2 cups in the medium plastic freezer bags, I label them with a magic marker so I can tell which kind of stock it is. You can use mason jars**, empty yogurt containers, or whatever you wish that will freeze well.  (**if using mason jars be sure to leave room in your jar, as the broth will expand when freezing, and can potentially break the jar)
I like to keep a good supply of bone broth on hand in the freezer, so it is always ready when you need it. 

Ready to go!
After 24 hours
Strain before cooling
Meat pulled off after
8 hrs cooking
skim the fat before freezing
pour cooled broth into baggies
to freeze.

Thursday, 7 March 2013

Sloppy Joes


This is one of my boys favourite suppers.  And it goes together easily, ready in about ½ an hour tops, which makes it a great weeknight meal. The boys usually have it on buns, but being as Jim and I are not eating wheat anymore, I served ours on lettuce leaves.  You may think this would make them extra “sloppy”, but they were not at all. We usually use romaine lettuce leaves, and they held up nicely! I have substituted both ground chicken and ground turkey for this recipe with great success as well.

Sloppy Joes

2 tbsp coconut oil
1 medium onion, diced
1 medium green pepper, diced
3 stalks of celery, diced
2 cloves of garlic, minced
1 lb grass fed ground beef
½ cup crushed tomatoes ( I like the Eden brand in the glass jars)
½ can organic tomato paste (probably about ¼ cup?)
1 tsp salt
2 tbsp Worcestershire sauce

In a large skillet, sauté the onion, green pepper, celery and garlic in the coconut oil over medium high heat, until starting to brown and soften. Make sure to stir often!  Add ground beef, and continue sautéing until cooked thru, about 10 minutes or so.  If your beef is fatty, you can drain it now if desired.

Add crushed tomatoes, tomato paste, salt and Worcestershire sauce, and simmer till thickened, about 10-15 minutes.
Serve on buns, or lettuce leaves with mustard if desired.
(you can disguise a lot of veggies in here, feel free to add any other finely diced like zucchini, carrots, mushrooms, whatever you have in the fridge…they will never know!)

Tuesday, 5 March 2013

Bean Free Crock Pot Chili


I am not great with the whole bean digestion thing. So I have been (pardon the pun) avoiding them for the past little while. But I really have missed having a nice warming bowl of hearty chili on a cold winters day. So, I threw together this bean-less version today. Sauteing the veggies first adds a ton of flavour, and IMHO should not be skipped.  I hope you like it!


Bean Free Crock Pot Chili

1 lg red onion, diced
3 stalks celery, diced
1 lg carrot, diced
1 medium zucchini, diced
2 tbsp coconut oil, divided
1 lb grass fed ground beef
1-2 tbsp chili powder from recipe below(to taste)*** 
1  tsp salt
1 28 oz can organic diced tomatoes

Sauté the veggies in batches in a large cast iron pan, using 1 tbsp coconut oil with each batch.
As soon as they start to brown and soften a wee bit, transfer to crock pot.
Sauté the ground beef until it just starts to brown.  (add an extra tbsp coconut oil if your beef is too lean) Add the chili powder and salt, cook for 2 minutes, and transfer with any pan juices to the crock pot.
Add the can of tomatoes with the juices, and give everything a good stir to combine well.  Cook on high for 4 hours(or low for 6-8 hrs) . Serve as desired, over rice, with organic corn chips or however you wish!!
***I was out of chili powder, which almost kyboshed this whole meal plan. But, the internet saved me with this make your own chili powder mix. I used paprika, and regular oregano, plus I added ¼ tsp of chipotle, plus 1 tbsp garlic powder from the optional ingredients. The recipe appears here: http://www.thekitchn.com/from-the-spice-cupboard-chili-126876