This blog is all about Food. Real Food. Food that Nourishes, Heart and Soul.

Real Ingredients, Organic and Locally sourced whenever and where ever possible, shared with love.

No packages, no ingredients that are impossible to pronounce.

Real, honest food, from my kitchen to yours. Enjoy!

Showing posts with label Bread. Show all posts

Friday, 11 December 2015

Grain Free Baguette

This recipe has been a work in progress since the end of September. We were taking a much needed break in the Fingerlakes with our wonderful friends. We planned a 4 day escape and rented a lakeside cottage over one of the most beautiful fall weekends you could ask for.  We hiked Watkins Glen, and had some absolutely delicious meals! (in a cottage with hodge podge of kitchen implements, it was a bit of a challenge to cook!) But, we succeeded in creating some memorable meals, and enjoyed some very much needed time away.

Our view from the deck
Watkins Glen has to be one of the
most beautiful places I have been!
renamed this one "flatbread"
Anyhoo, the whole grain free baguette quest started with a trip to Wegmans (Have you been to Wegmans?? What an amazing grocery experience!! We need Wegmans in Canada!!)We picked up a frozen Against The Grain baguette to go with dinner one night. It was pretty darn tasty, and you would honestly never know it was grain free. Which, of course, made me want to make it myself. Easy peasy…or so I thought….(those of you who follow my Facebook page may remember some of these...)

Dense! But the right shape!!
This one went straight in the trash :(
Well, multiple tries and multiple fails later, I FINALLY came up with a winner! Taste, texture and look, it has it all. It has a great shelf life for grain free as well.  It keeps well for 4 days on the counter in an airtight container, and freezes like a dream. I have toasted it as crostini, used it as a bruschetta base, and have enjoyed multiple slices with a simple skim of butter. It does not disappoint!

In all my trials I have used multiple different types of cheese, and I find ones with less moisture content work best, like a grana padano (my fav) or parmesan. That being said, I have used cheddar, asiago and mozzarella as well with good results.

My favorite cooking method is on my pizza stone in the oven, and while it gives the crust a bit more crunch, it is not absolutely necessary if you do not have one. I have used a sheet pan as well, and it works just fine.
The dark interior colour comes from the chia. I have a very large bag of black chia seeds right now, and all my experimenting has been with them. Using white chia would lighten up the inside of the bread although it won’t alter the taste at all. Give the seeds a quick whiz in a blender before using!

Grain Free Baguettes

1 c whole milk
½ cup avocado oil
-----------
finely grated Grana Padano
3 c tapioca starch
½ c ground chia seeds(whiz in a blender jar!)
1-1/2 tsp baking soda
1 tsp salt
-----------
2 eggs
2 tsp apple cider vinegar
--------------
100g  cheese, grated with small side of grater (just shy of 1 1/2 cups, NOT packed!)

Heat milk and avocado oil on medium low heat until bubbles start to form all around the edges of the pan, approx 6 min. You want it very warm but not really boiling. 

While milk is heating, in your stand mixer with paddle attachment, mix the tapioca starch, chia, baking soda and salt on low until combined.
Add the hot milk and turn up a notch on your mixer. Let mix until the mixture becomes a fairly smooth dough. Continue mixing until the dough becomes cooler to the touch.
When the dough is cooler, add the vinegar, and the eggs, one at a time, letting them combine somewhat in between. 
Mix until the eggs are well mixed in and your dough smoothes out again. It will take a bit to mix in, but trust me, it will!!
Add the grated cheese and mix well. Turn mixer off, scrape down sides of bowl with firm spatula and mix again for 1 minute to ensure all ingredients are well combined. 
Preheat oven to 425 with rack in the middle position. If you have a pizza stone, put in oven on the middle rack before preheating.

Divide dough in half evenly and with WET hands shape into two long thin baguettes on a piece of parchment paper.  Rewet hands as needed, the dough is sticky and wet hands help greatly with the shaping of your loaves!
With a wet serrated knife, slash shallow cuts diagonally across the tops of your loaves, re-wetting knife blade if it starts to stick.
Using a pizza peel (or the back of a cookie sheet) slide your loaves (still on parchment) onto hot stone in preheated oven. (alternatively, if you have no pizza stone, place the loaves (still on parchment)  on a large sheet pan and place in preheated oven)
Bake for 25 minutes or until baguettes are nicely risen and browning. Do not under bake as it changes the inner texture of your loaf.


Remove from oven and let cool on wire racks before slicing. Store in airtight container for up to 4 days at room temp. Freezes really well. 

Wednesday, 11 June 2014

Grain Free Dairy Free Rhubarb Coconut Bread Pudding


After perfecting my Lovely Grain Free Bread Recipe, using it in a bread pudding was a priority. With being gluten/almost grain free for close to 2 years, desserts like this, as well as the bread that would typically make this, have not been a part of our diet. When my bread turned out so amazingly well, I knew it would make a lovely bread pudding too. 

Our wonderful friends Ken and Ally were coming over for dinner, and I always try and create a decadent dairy free dessert for them. This was definitely a winner. The recipe makes a lot, feel free to half it if you wish. But, as Ally said the next day, it makes a wonderful breakfast, so you may want to make it as is, and share the extras with friends!

I used some nice flaky Maldon salt on the top of the puddings. If you don’t happen to have any, just add sea salt in with the liquids instead.

You won't use the entire loaf of bread with this recipe, the extra slices make nice croutons for a Ceasar Salad ;)


Grain Free Dairy Free Rhubarb Coconut Bread Pudding

3 cups chopped fresh rhubarb (approx 6-8 stalks, depending on size)
½ cup coconut sugar
--------
2 -400ml cans full fat coconut milk
8 eggs
1 tsp vanilla powder or 2 tsp vanilla extract
1/3 cup coconut sugar
2 T Grand Marnier (optional, you can substitute 2 T fresh orange juice and the zest of an organic orange)
1 tsp sea salt (omit if using the salt flakes at the end)
----------
¾ of a loaf of my Grain Free Bread (Get Recipe Here!) you should end up with about 6 cups of bread cubes)
----------
½ cup shredded coconut, unsweetened
----------
Maldon salt flakes (optional, alternately add 1 tsp of sea salt to the coconut milk mixture when mixing)
-------------
METHOD: 

Preheat oven to 350F. Set 14 ramekins (mine hold approx 2/3 cup each, adjust accordingly if yours hold more or less) in baking dishes that will serve as a water bath, and set aside.  (9x13 glass baking dishes work well!) 

Combine the chopped rhubarb and the first amount of coconut sugar, and let it hang out and marinate for about ½ hour.  Stir the mixture a few times while you wait.

Combine coconut milk, eggs, vanilla, coconut sugar and optional Grand Marnier, (and optional salt if not using the Maldon salt flakes at the end), with an immersion blender until well blended.

Slice the grain free bread into 1 inch slices and then cut slices into cubes. 
Stir gently into the coconut mixture, and let hang out for about 5 minutes. Stir in the shredded coconut and the marinated rhubarb, and mix well.
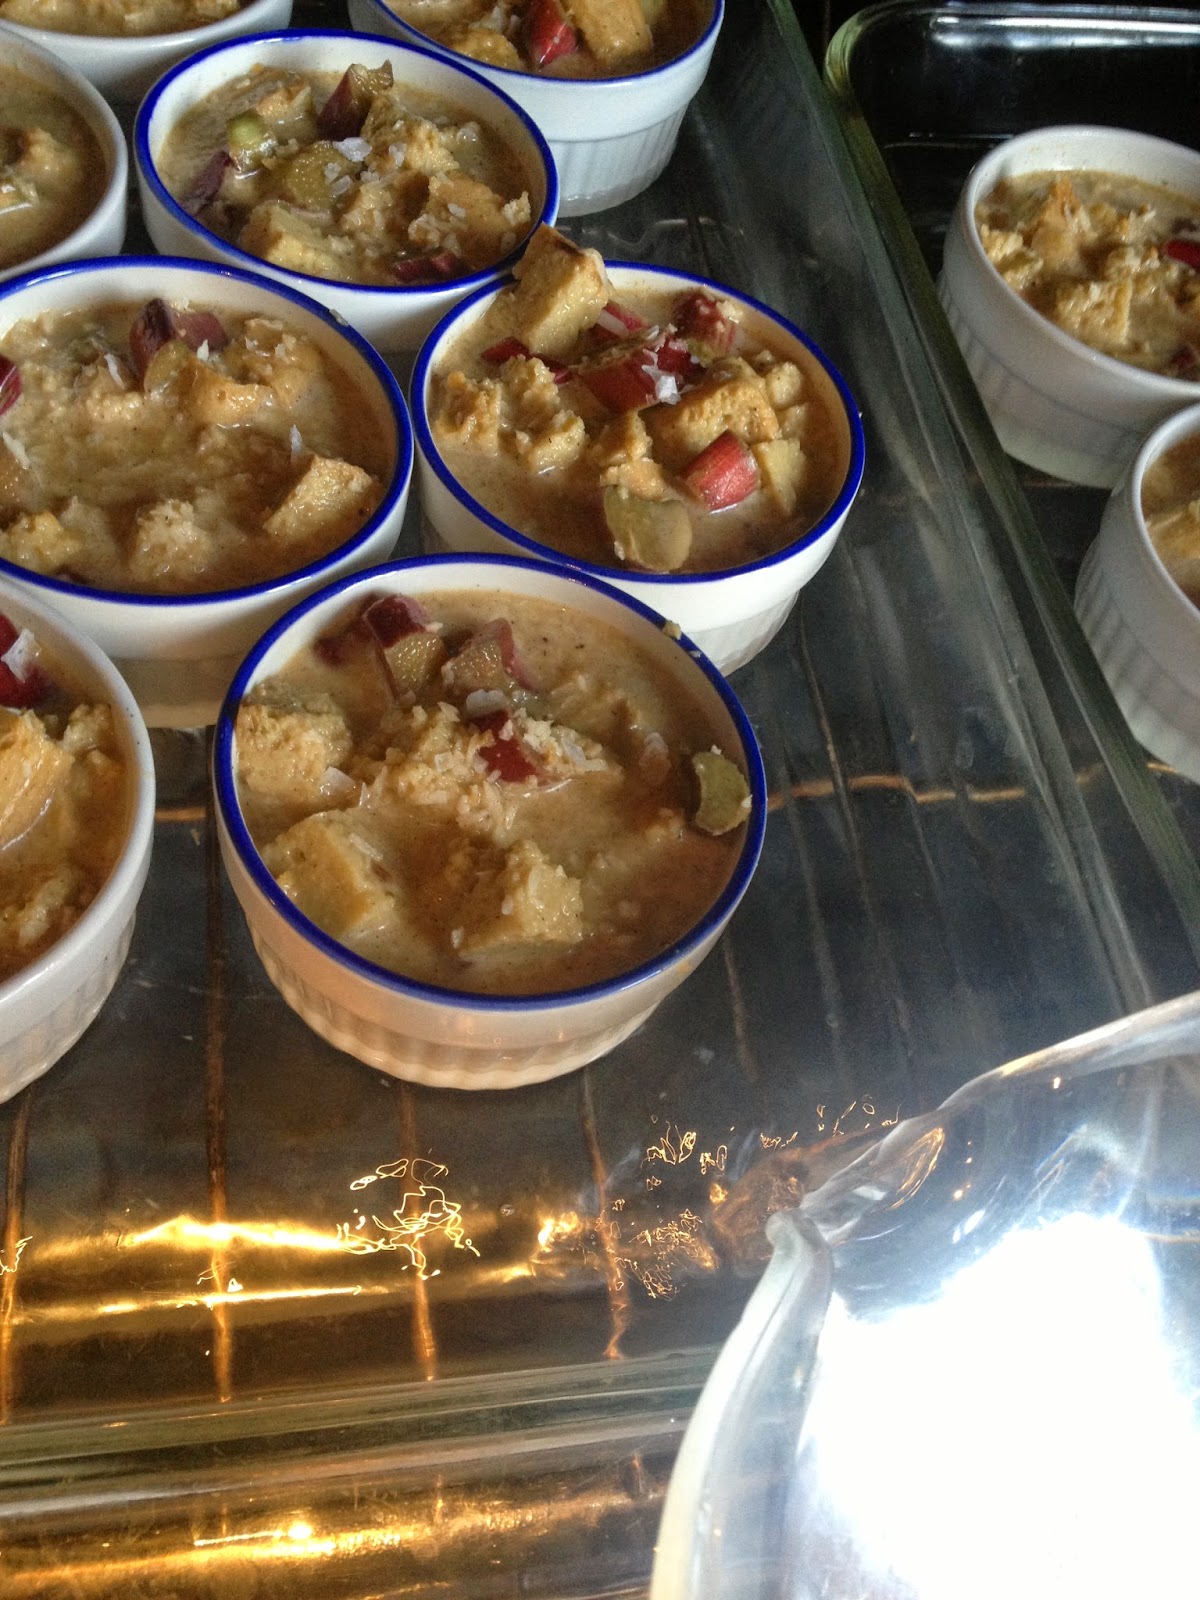
Spoon this mixture into the waiting ramekins. Arrange the ramekins in the baking dishes. Sprinkle the tops of the bread puddings with the Maldon salt flakes if using.

Run your tap water until it is as hot as it will go. Fill a large measuring cup or other pour-able vessel with hot water.
Place the pans holding the ramekins into your preheated oven. Carefully pour the hot water into the pans, surrounding the ramekins and coming just over halfway up the sides of the ramekins.
Bake for 50-55 minutes, or until the puddings are cooked thru. They will lose their liquidy look and firm up when cooked thru.
Let cool before serving. Can be chilled completely, but they are good warm too!

Serve with a dollop of whipped cream if desired. 

Friday, 6 June 2014

Grain Free Sandwich Bread

I will warn you now, this is a long post! But, it is so worth it! This is Grain Free Bread folks! It slices! It lasts at room temperature!(and it actually gets better the next day!) And...it tastes pretty darn good! So bear with the wordiness, and the plethora of pictures. (and the number of exclamation points I may have just used!) I think you can tell, I am really excited to share this recipe!

After embarking on this gluten- free, almost- grain- free journey, bread has all but disappeared from our diets. We were not big sandwich eaters to start with, so lunch packing was never a big issue. Soups, salads and leftovers are our go-to lunches, and this made the transition pretty easy. Our boys were content to have the occasional store bought loaf for when they had a craving for toast.  So it was never anything I put much thought into when creating new recipes. (Actually I did attempt one loaf, from a recipe I found (and promptly lost!) that used only coconut flour, and the resulting brick just “cemented” my decision that life without bread was not such a bad thing!)  But, being as it is probably THE #1 recipe I get requests for above all others, I decided to conquer it, once and for all. It seems to be the one thing most people cannot fathom giving up, and that seems to make or break their decision to stick with this type of diet. So I needed to come up with a tasty, slice-able loaf that would last, preferably without freezing. For those versed in grain free baking, it was a bit of a tall order!

Not one to shy away from a challenge (and this one was a challenge!) I rolled up my sleeves and got to work. I ended up using tapioca starch, an ingredient that I have not played with a lot. It gives this grain free bread the elasticity that is missing using just coconut flour. It is a starch, however, and does contain a fairly high amount of carbs (approx 26g/carbs in ¼ cup) so for those watching carbs and calories, this bread should still be considered a treat, and not a diet staple.  (I roughly worked out the carbs and it rolls in at approx 8-9 g/carbs per slice if you slice the loaf into 14, so not crazy, but again, not a diet staple if you are watching those kind of things) (It does slice thinly very well, you can probably squeeze many more slices out of your loaf…this was just for an example!)

No crumbs!
Enough with the scientific data! If you are OK with using Tapioca starch/flour, you will be very, very, VERY happy with this recipe. (at least I think you will be!) The loaf it makes is not typical bread sized. It is definitely a bit on the shorter side. But what it lacks in size it makes up for in flavour! On the first day, it has a nice crisp crust and a soft, albeit somewhat spongy interior. Day two, after being stored on the counter in a sealed container, the crust becomes slightly chewy, losing its crunch, but not in a soggy bad way at all. It is content to stay on the counter, in a sealed container for 3-4 days, and is almost better on day 3 than day 1, which is pretty cool. (It does seem to mold by day 5 though, just to warn you!) It slices like a dream, hardly a crumb in sight! It makes a lovely sandwich (my friend Robin is curing her own bacon…a BLT party is in the plans!)  and even better French toast. I can’t wait to play around a bit, maybe a cinnamon raisin version? I have used it very successfully for morning toast, croutons, sandwiches, and a very tasty dairy free bread pudding  that I will be posting soon as well(Posted! click on the link). Challenge well met, if I do say so myself :) ***if you scroll to the bottom, I added some pics to show how I use this recipe for Grain Free English Muffins, that are heavenly!!

Grain Free Sandwich Bread

6 eggs, separated
1/3 cup coconut flour
1/3 cup arrowroot flour
½ cup tapioca starch
1/3 cup water, at room temp
1 Tbsp raw apple cider vinegar
1 tsp sea salt
¾ tsp baking soda
1/3 cup coconut oil, melted

Preheat oven to 400 F. Line a loaf pan with parchement (mine measures 9.25 x 5.25 x 2.75 inches, for the cooking time to be the same you will need a similar size) Set lined pan aside for now. (see pictures at the bottom of the post for a tip on lining your pan easier! If you decide to grease your pan instead, grease really really well!)
Place egg whites in stand mixer and whip with whisk attachment until stiff, approx 8 minutes. You don’t want any liquid left in the bottom, or it will make the loaf heavier on the bottom.  (Don’t skip this step, it is very important to the texture of the bread!) (Alternatively use a hand mixer or whisk, but not an immersion blender, it doesn't whip in enough air, the end result will not be the same)
While the egg whites are beating,  measure the rest of your ingredients into an 8 cup mixing bowl and blend well with an immersion blender or a whisk and some elbow grease.
Fold about ¼ of the whipped egg whites carefully into this batter, mixing carefully to combine, but not deflate the volume. Mix in the rest of the egg whites in 3 batches, again being careful not to deflate the egg whites, but combining just enough.
Carefully scrape the batter into the prepared loaf pan, and bake in preheated oven for approx 40 minutes.  
You want to see a nice golden crust. A toothpick inserted in the centre should come out clean.  (bread baking tip from my former baking –with –wheat days, if  you have an instant read thermometer, you want the internal temperature of your loaf to be right around 160F.)
Remove from oven, and lift loaf from pan using parchment. Let cool on wire rack completely before slicing.
Lasts on the counter in an airtight container for 3-4 days. (If it lasts that long without being devoured!) It will have a crisp crust for the first day, and a softer chewy crust after it sits.  I slice any leftovers and freeze, with a piece of parchment or waxed paper between each slice for easy removal one slice at a time)
toasted, served with a tomato and
kale omelet :)

To line a pan with parchment, flip
your pan over, and crease your parchment
paper following the bottom edges of the pan.
Fold them around the ends, kind of like
wrapping a parcel.
Flip your pan back over and your
liner should drop right in your pan! You
may need to re-crease the corners a wee bit to
make the fit nice and snug!


This recipe is a perfect amount to make 8 english
muffins with these awesome little english muffin rings.  
Grease rings well, set on parchement, and bake at 400F
for 16-18 minutes or until they are firm and starting to brown. 

Carefully run a sharp knife around the inside of the rings
to release them, and let cool on a wire rack. They freeze beautifully!
Toasted with a bit of butter and jam...pure grain free heaven!