This blog is all about Food. Real Food. Food that Nourishes, Heart and Soul.

Real Ingredients, Organic and Locally sourced whenever and where ever possible, shared with love.

No packages, no ingredients that are impossible to pronounce.

Real, honest food, from my kitchen to yours. Enjoy!

Showing posts with label garlic. Show all posts

Friday, 7 July 2017

Garlic Scape Lemon Compound Butter


I love garlic scapes. They are the yummy precursor to the lovely garlic that gets harvested towards the end of summer in my garden.,,,kind of like a bonus harvest on a garden staple, fleeting but delicious! Many farmers markets and stands sell them if you don't grow your own garlic so be sure to look for them from mid June to early July.
I do tend to stick to my favourite recipes with scapes, (like pesto, and this recipe below for compound butter) but they are very versatile and can be used for many different recipes if you are creative! (do a pinterest search...they are used in absolutely  EVERYTHING!!! ) I chopped a bunch this year in my food processor and froze them in an ice cube tray so that we can hopefully enjoy the harvest for way longer than we usually do. (see pics below!!)

This compound butter can be used for a multitude of things, from buttering my grain free baguettes, to topping baked potatoes, to searing a cast iron cooked steak. It's lovely vibrant green colour and garlicky bite  transform a multitude of foods to a completely different level of flavour.

Try this recipe before the scapes are gone again for the season!!

Garlic Scape and Lemon Compound Butter

Approx 8-10 garlic scapes, roughly chopped (you want to end up with about 1/ 2 cup when finely chopped)
¾ cup butter cut into 6 chunks (mine was not quite room temp but not cold either!)
Zest of 1 lemon (ALWAYS organic!!)
Juice of 1 lemon
S&P to taste (if butter is salted, as mine often is... add less salt!!)

Pulse garlic scapes in food processor until finely chopped.  (shown with LOTS of scapes, I scooped out a bunch to be left with 1/2 cup)
With machine running, add butter 1 chunk at a time until smooth and incorporated. 

Stop the processor, add the lemon juice, zest, s&p, and turn back on until incorporated, stopping to scrape down sides as needed 

Scrape out of processor and shape into log on plastic wrap. (shown on waxed paper, but plastic wrap works best)

Refrigerate until firm and slice as needed. For storage longer than 5 days, keep in freezer.
Shown on my  grain free baguette :)

chopped and prepped for freezer

covered ice cube tray is perfect for freezing :)


Thursday, 3 October 2013

Oven Roasted Tomato, Onion and Garlic Sauce

This post  is pretty typical of how I create a lot of my recipes. If I have a plethora of something to use up, I usually throw something together to use up whatever that plethora may be. This time of year there is always an excess in the garden just begging to be used. Tomatoes were the needy ingredient of the day, and with the fruit fly invasion that has been plaguing my kitchen, time was of the essence! The ingredients won’t have exact measurements, but I will try and give a general idea of how much to use. The tomatoes were not any specific kind, I used some of every type in our garden, from the “tiny tim” cherries to the larger red ones that have no name, (I think there was even one green zebra!) So, not your typical sauce tomatoes, but any should work just fine!
This sauce is pretty fuss free, no peeling/blanching/straining required, just some time to roast in the oven, a perfect way to warm up the kitchen on a cool fall morning. The roasted onions add a nice body to the sauce, no need to boil it down for thickness. This is an awesome technique for peeling garlic that you have to try. I will warn you it is loud, but when you are peeling multiple cloves, it is a real time saver! All in all, an easy sauce with great roasted flavour.
Served over zucchini noodles, with
meatballs and a grain free biscuit.

Oven Roasted Tomato, Onion and Garlic Sauce

Tomatoes, (when chopped up, mine made a nice single layer on two cookie sheets)
Garlic (approx 8-9 cloves)
Onions (12 smallish onions, or 3-4 regular sized yellow cooking onions)
Coconut oil, melted (enough to give a drizzle to both pans)
Salt to taste
1 tsp Coconut sugar (optional, but rounds out the flavour)


Preheat oven to 425F, and line 2 large cookie sheets with parchment paper. 
these are what I consider a "smallish" onion
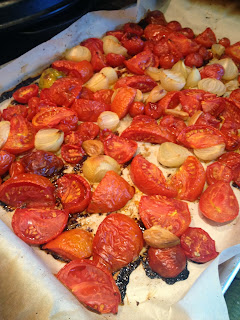
Chop your tomatoes (the tiny cherry tomatoes I left whole) into smaller chunks (see picture below for clarification).
Peel and chop your onions into similar sized chunks, add to the pans.
Peel your garlic (awesome way to peel a whole head of garlic here! It really works!!), cut cloves in half and add to the pans.
Drizzle each pan with some melted coconut oil, if I had to guess I would say there was about 1 ½ tbsp used on each pan.
Sprinkle with a bit of sea salt, and roast for about 1 ½ hrs in preheated oven. Check every so often, you want to remove them when the veggies are starting to brown and release their juices.
Remove from oven and allow to cool slightly before proceeding.
Lifting the parchment carefully, transfer the contents of both pans into a large mixing bowl. Using an immersion blender puree the sauce until it is nice and smooth.  (if you don’t like the seeds, you can strain it at this point, I generally don’t) Add the coconut sugar if desired, and re-season with salt to taste.
Serve immediately or store in mason jars in the fridge for 3-4 days, or in the freezer for 6-8 months, (just remember to leave room for expansion if freezing)

Mine made approx 7 cups of sauce.